
UniFi Dream Machine (UDM) Review
Originally Posted: March 8th, 2020
Last Edited: February 14th, 2021
UniFi Dream Machine (UDM) Review
The UniFi Dream Machine (UDM) gives you everything you need for an UniFi network in one device. It looks like a normal home router. In UniFi terms, it is a UniFi OS Console, meaning it can run other UniFi software.
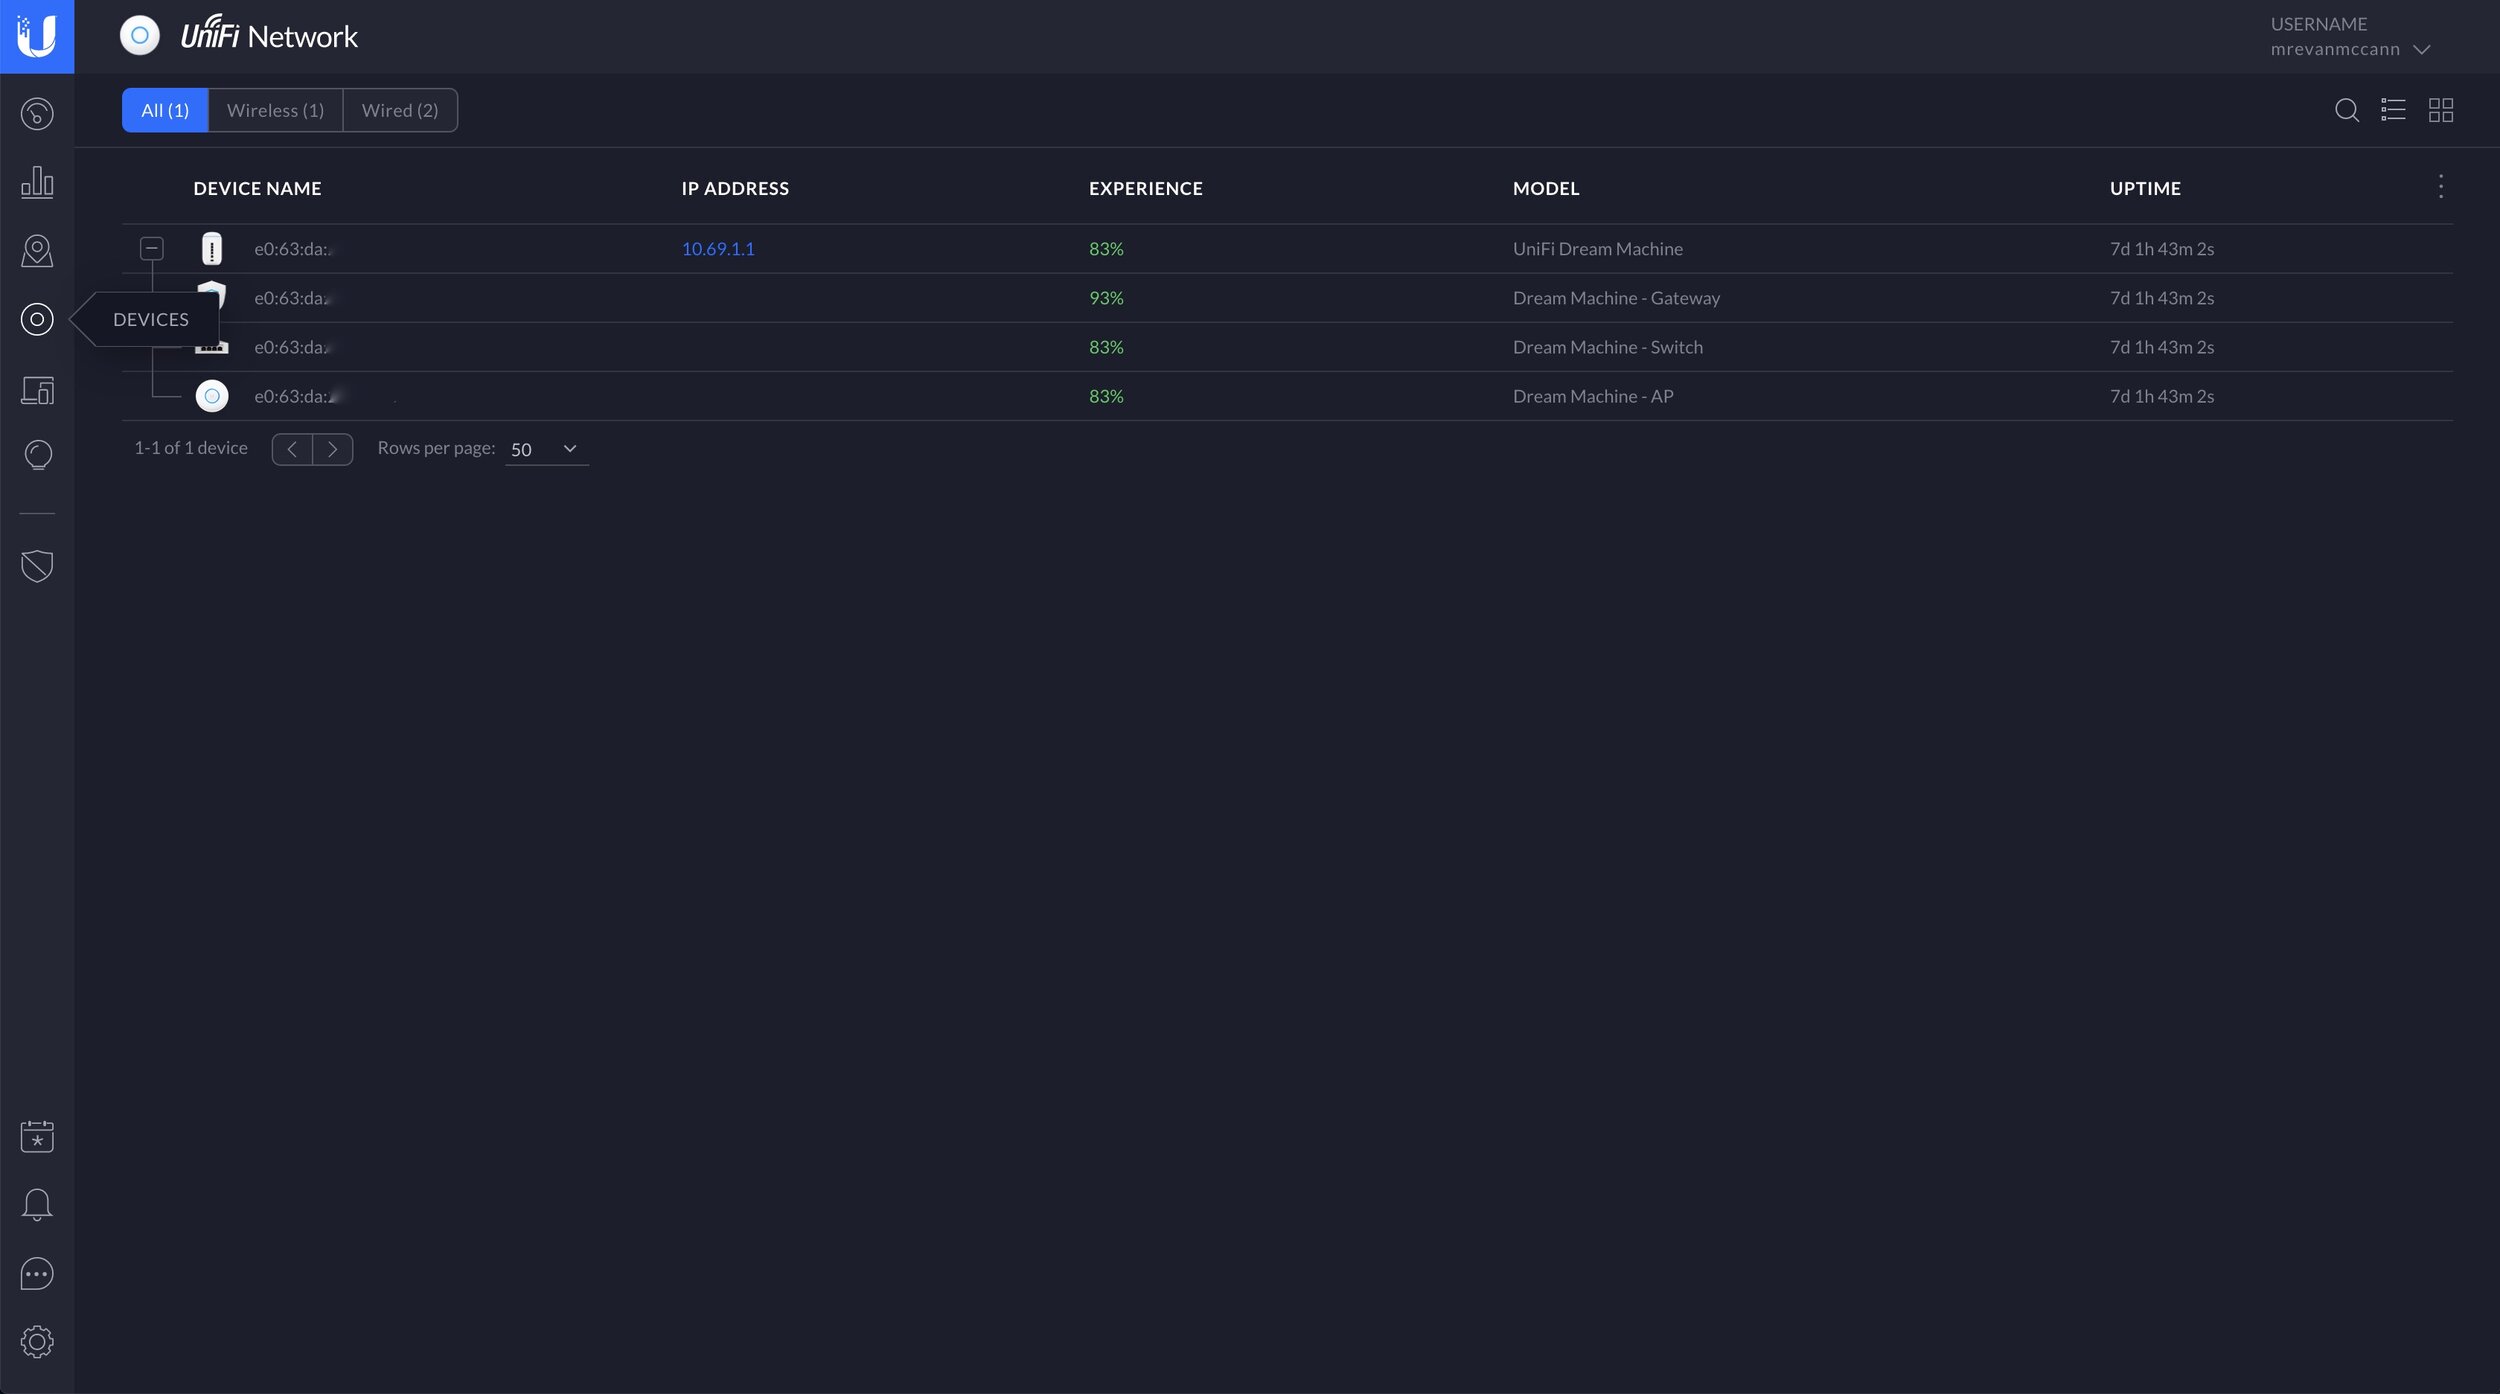
The UDM can be a UniFi Network controller in addition to being a router, switch and access point. It has the same CPU as the UDM-Pro, making it a capable security gateway for fast internet connections. The managed gigabit switch lets you connect four devices, or network switches for even more wired ports. The 4x4 802.11ac Wave 2 wireless access point is equivalent to a nanoHD — good enough to cover apartments or small-to-medium sized houses and businesses. The built-in UniFi Network software allows you to monitor and configure your network from anywhere, in a web interface or smartphone app.
Quick comparison of the UDM and UDM-Pro. Image credit: Ubiquiti.com
The UDM is a unique product in the UniFi line. Most UniFi devices are standalone, and it’s up to you to pick which are right for your network. With the UDM, Ubiquiti made those choices for you. You can think of the UDM as a UniFi starter kit. Integrating all the components in one device has a lot of benefits, but also some limitations. Before we get into that, let’s compare UniFi with Ubiquiti’s other line of home networking products, Amplifi.
Amplifi vs UniFi
Ubiquiti makes two main product lines for home or small business networks, Amplifi and UniFi. The AmpliFi brand is similiar to Eero and Deco, and it’s for people who are looking for a simple solution. They are easier to setup and operate, but lack most of the features of UniFi. If you are the type of person who doesn’t know what a VLAN is, and doesn’t care to learn, Amplifi is for you. Amplifi devices automatically form a mesh network — no Ethernet cabling or advanced configuration required.
The Amplifi Instant is as simple as it gets. They come in one or two packs. Buy as many of them as you need, then set them up with Eero-like simplicity. The Amplifi app guides you through the process, and a few minutes later you have great, reliable Wi-Fi. The Amplifi HD and Amplifi HD Gamers Edition offer a bit more performance. They typically come in a 3-pack, featuring one base station and 2 mesh nodes. The most recent Amplifi Alien and Amplifi Alien Kit offer the highest performance by being AmpliFi’s only Wi-Fi 6 capable devices so far.
If you are more of a networking nerd, or want to learn some basic networking while building a customizable network, UniFi is the way to go. If you don’t want the integrated UDM or UDM-Pro, there are a whole UniFi ecosystem of security gateways, switches, access points and physical controllers to pick from. With the added complexity come advanced features that are not offered with Amplifi.
If you want more details, check out my full comparison of the UDM and AmpliFi Alien.
UniFi Dream Machine Specs
Dimensions - 110 x 184.2 mm
(4.33 x 7.25")Weight - 1.05 kg (2.32 lb)
Networking Interfaces
(4) LAN Gigabit RJ45
(1) WAN Gigabit RJ45IDS/IPS Throughput - 850 Mbps
Processor - Arm Cortex-A57 Quad-Core at 1.7 GHz
System Memory - 2 GB DDR RAM
On-Board Flash Storage - 16 GB
Max Power Consumption - 26W
TX Power
2.4 GHz - 23 dBm
5 GHz - 26 dBmAntenna - (1) Dual-Band, Quad-Polarity Antenna
Antenna Gain
2.4 GHz - 3 dBi
5 GHz - 4.5 dBiWi-Fi Standards - 802.11 a/b/g/n/ac/ac-wave2
Wireless Security - WEP, WPA-PSK, WPA-Enterprise (WPA/WPA2, TKIP/AES), 802.11w/PMF
All-In-One vs. Modular Unifi
Before the Dream Machine, a UniFi network had four main components: gateway, switch, wireless access points, and the controller software to configure it all. You picked which models and how many of them, and assembled those parts into a network of your design. This had advantages over an all-in-one like the UDM, and you can still choose to build your network that way. A true USG replacement isn’t here yet, but the UDM-Pro, 2nd generation switches, and Wi-Fi 6 access points are.
Even if you have your own router and switches, UniFi access points are good value APs. A properly-designed UniFi network with multiple access points will give you better coverage than even the best all-in-one routers or wireless mesh systems. With UniFi, you can expand and upgrade as needed, without replacing everything. If you need rackmount gear, or a lot of Ethernet ports and POE devices, you are better off going with UniFi.
Since it is a basic all-in-one, the UDM lacks a number of features that other UniFi devices can have — dual WAN support, 10 Gbps SFP+ uplinks, PoE out, multi-site support, and a bunch of others. Some of these are hardware limitations, but some can be fixed with software updates. If that list of missing features includes something you need, go with a USG or wait for the upcoming UXG-Pro. The UDM is a different product aimed at a different type of user.
While the UDM doesn’t have all the flexibility of the older UniFi products, it makes up for that in being convenient and cost effective. If you went out and bought all the equivalents, you’d end up spending more and getting less in a few ways. The USG and USG-Pro can’t match the performance of the UDM. You still have the option to expand your UniFi network, even if the UDM is where you start.
UDM Expandability
Despite it’s all-in-one nature, the UDM has most of the expandability options the UniFi line has. The built-in controller can adopt downstream network devices. You can add a switch if you need more wired devices or PoE out. If you need more wireless coverage, you can connect an UniFi AP. Since the UDM does not provide PoE, make sure you have a way to power those devices, either with a power injector or separate PoE switch.
An easy option to expand the wireless coverage of the UDM is to use the BeaconHD mesh AP. The BeaconHD extends the wireless signal of the UDM on the same wireless channel, and won’t perform as well as a traditional wired access point. If you want more details on the BeaconHD, check out my full review of the BeaconHD and the UniFi Power Plug.
UDM Remote Management
The big limitation of the UDM and UDM-Pro is that they can not be adopted to an external UniFi controller. That means they can’t be adopted to a self-hosted or cloud-hosted UniFi controller, and they don’t support multiple sites. This complicates their deployment for IT shops and managed service providers, and means the UDM is a better fit for a home or small business network.
Ubiquiti does provide free remote access to the UDM’s controller, but that requires using their free cloud service and typing the device to your ui.com account. It’s worth noting that Ubiquiti also recently had a data breech, so if you’re using this option make sure to use a strong password and 2FA.

UniFi Protect
One feature the UDM doesn’t support is UniFi Protect, Ubiquiti’s security camera software. There is no way to power or record those cameras with just the UDM itself. The Cloud Key Gen 2+ and the UDM-Pro are both capable of becoming a NVR, but the UDM is not. If you are planning on adding some cameras, you will need one of those devices, or their dedicated rackmount NVR. Another feature missing from the UDM is support for the access control and VoIP applications, UniFi Access and UniFi Talk. Both of those will require a UDM-Pro or Cloud Key with UniFi OS.
UniFi Dream Machine Setup
The initial setup of the UDM is very simple, and I won’t cover it in too much depth here. If you want a visual guide to how to adopt and get started with the UDM, refer to my UDM Setup Guide for the basics. I show how to setup a remote access VPN and portal-based guest wireless network below.
To get the UDM up and running, you need to give it power and an Internet connection. Most often, that internet connection will be coming from your modem. If your ISP requires PPPoE or a static IP address, the UDM can do that for you. If your ISP requires more advanced authentication, you may be better off leaving your existing router in place and putting it in bridge mode. It depends on what your setup is, but try to avoid double NAT if you can.
Once you have your internet connection plugged into the WAN port, and the UDM turned on, you can use the UniFi smartphone application or a web browser to set it up. If you are using the app, it should automatically find the UDM and guide you through the process. If you’re using a web browser, connect your PC to a LAN port, go to 192.168.1.1, and login with your UI.com account. Once you are done with the initial setup, you can configure some settings in the app, or launch the UniFi controller software for the full experience.

UDM Local and Remote Management
A lot of settings can be configured locally or remotely via the smartphone app. The controller’s web interface is required for a lot of the more advanced settings. The web interface can be access locally via port 8443 of the LAN or WAN IP of the UDM. You can access it via SSH, giving you access to Ubiquiti’s custom Linux shell. You can also use Ubiquiti’s integrated remote access via https://unifi.ui.com with your UI.com account. The UDM supports two-factor authentication, although it fails back to not requiring 2FA when the UDM’s Internet connection is not active.
UniFi Dream Machine Remote Access VPN
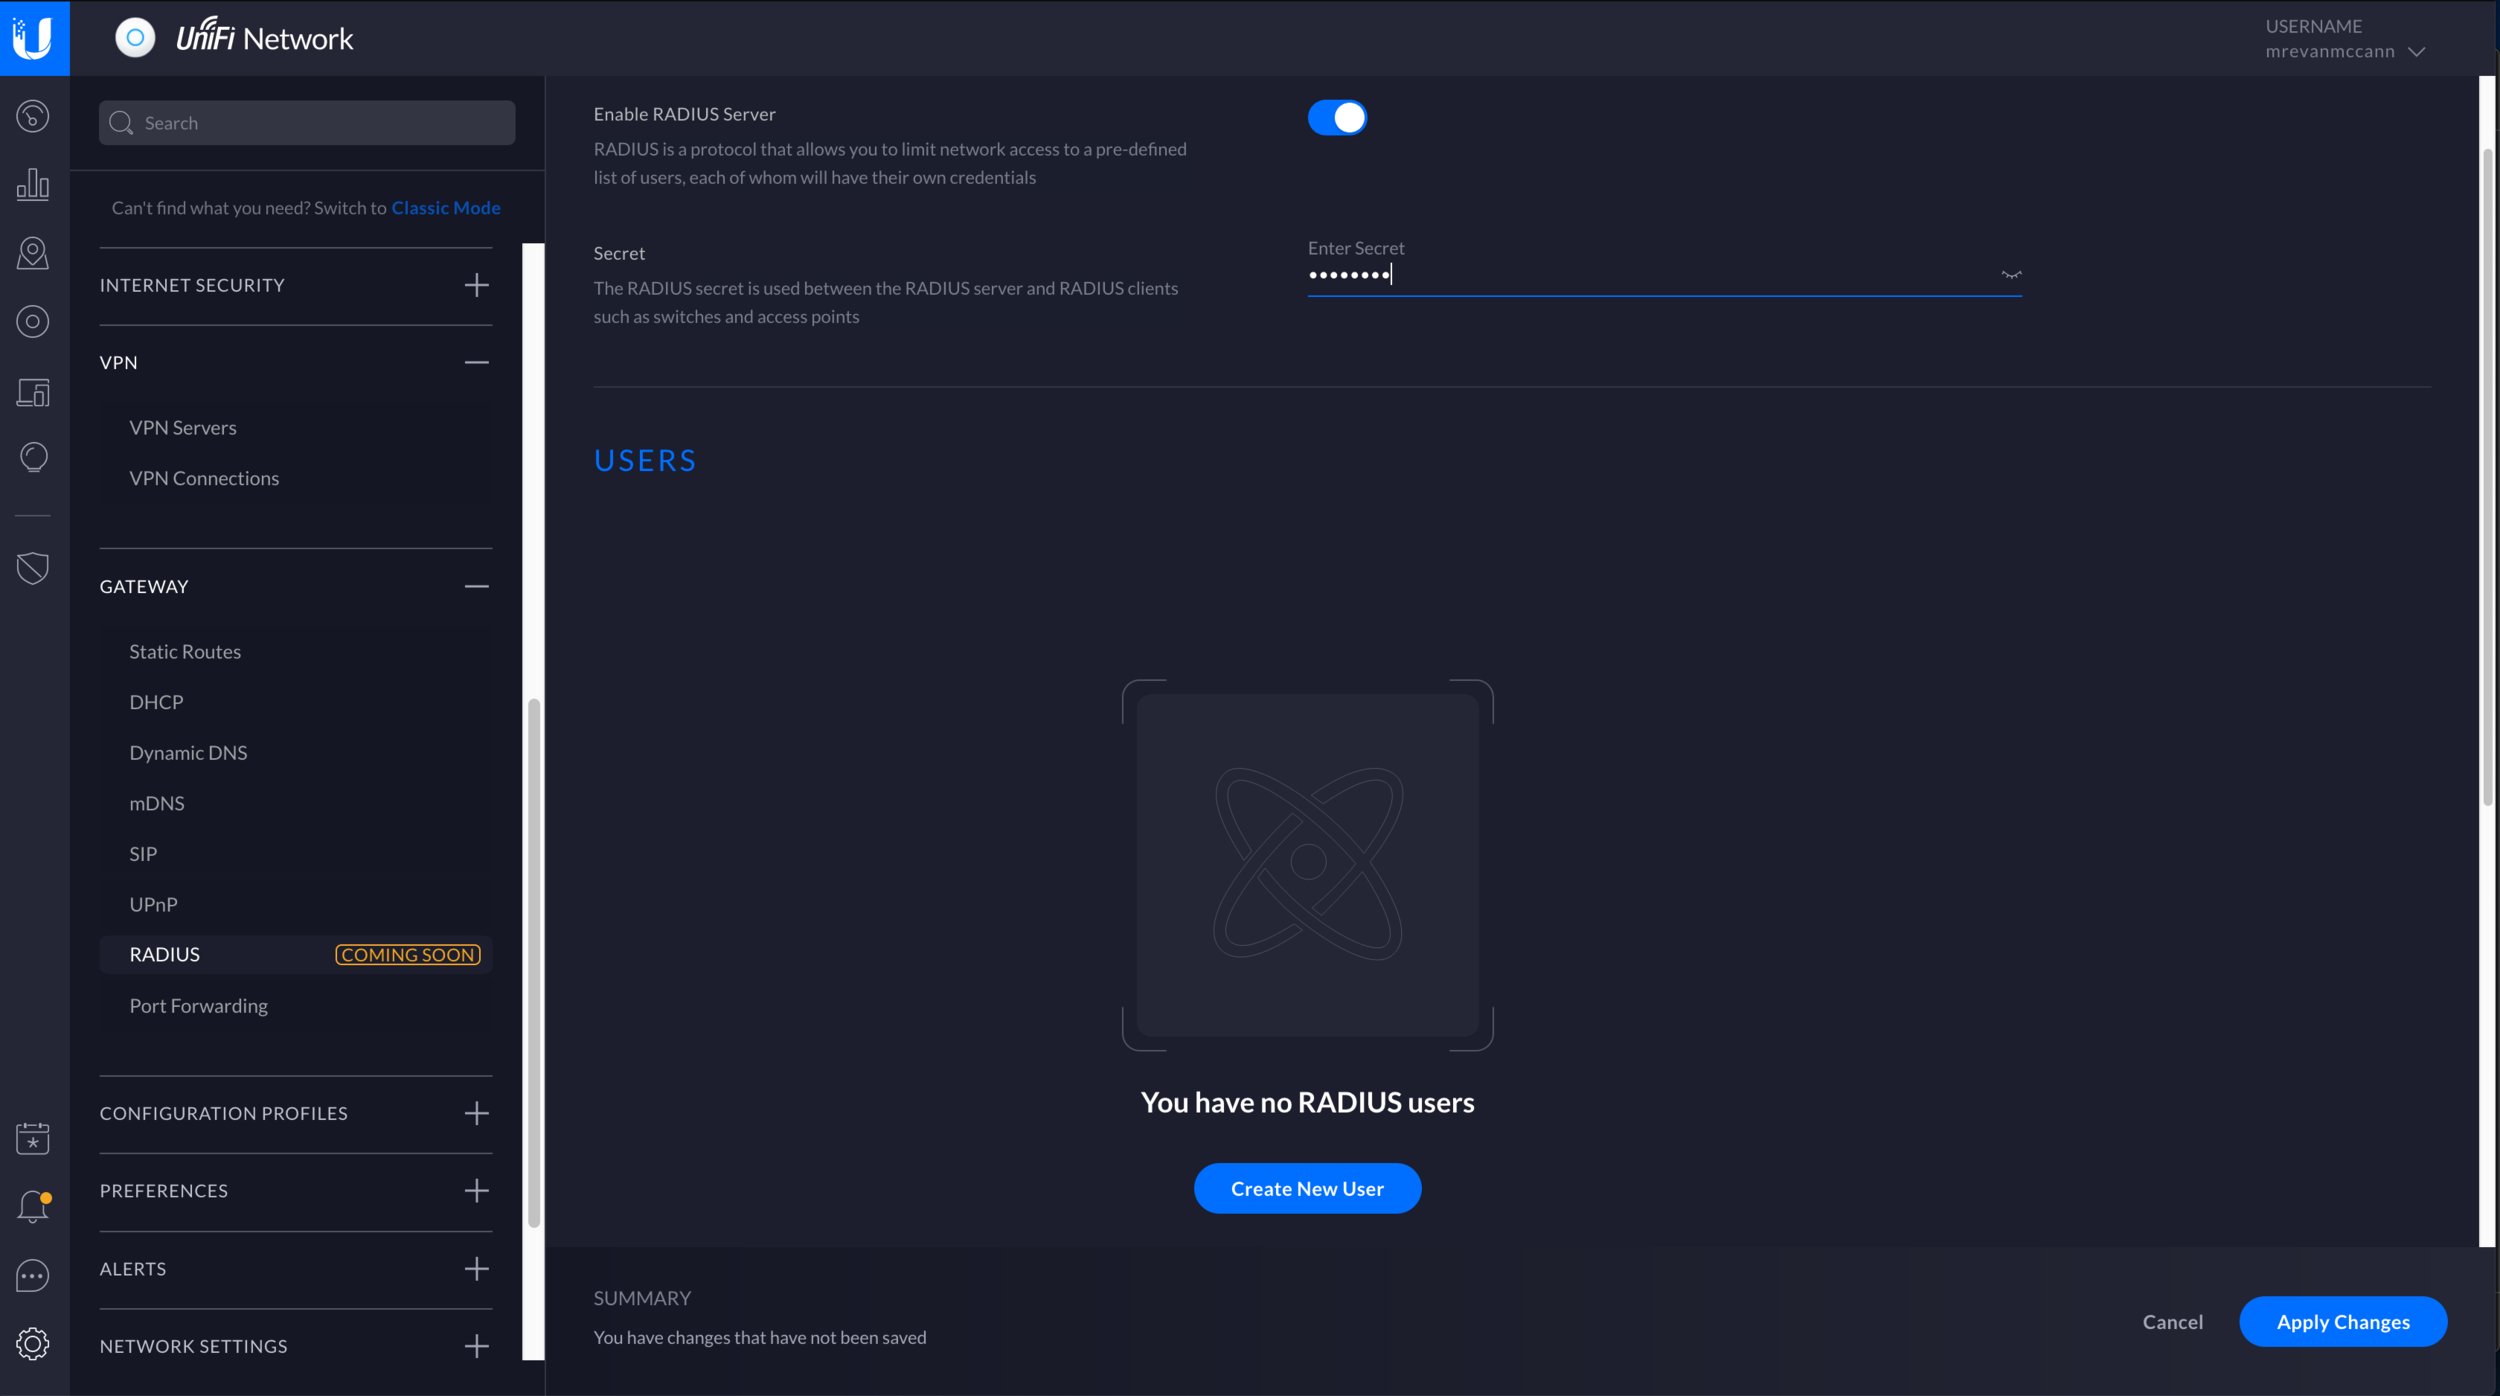
One handy feature of the USG and UDM is the ability to add a remote access VPN. The UDM uses RADIUS and L2TP with IPSec for encryption. You can roughly follow these instructions to set it up. There are a lot of edge cases that I am not going to cover, but here’s how I did it:
(Side note: This requires a public IP address on the WAN connection of your UDM.)
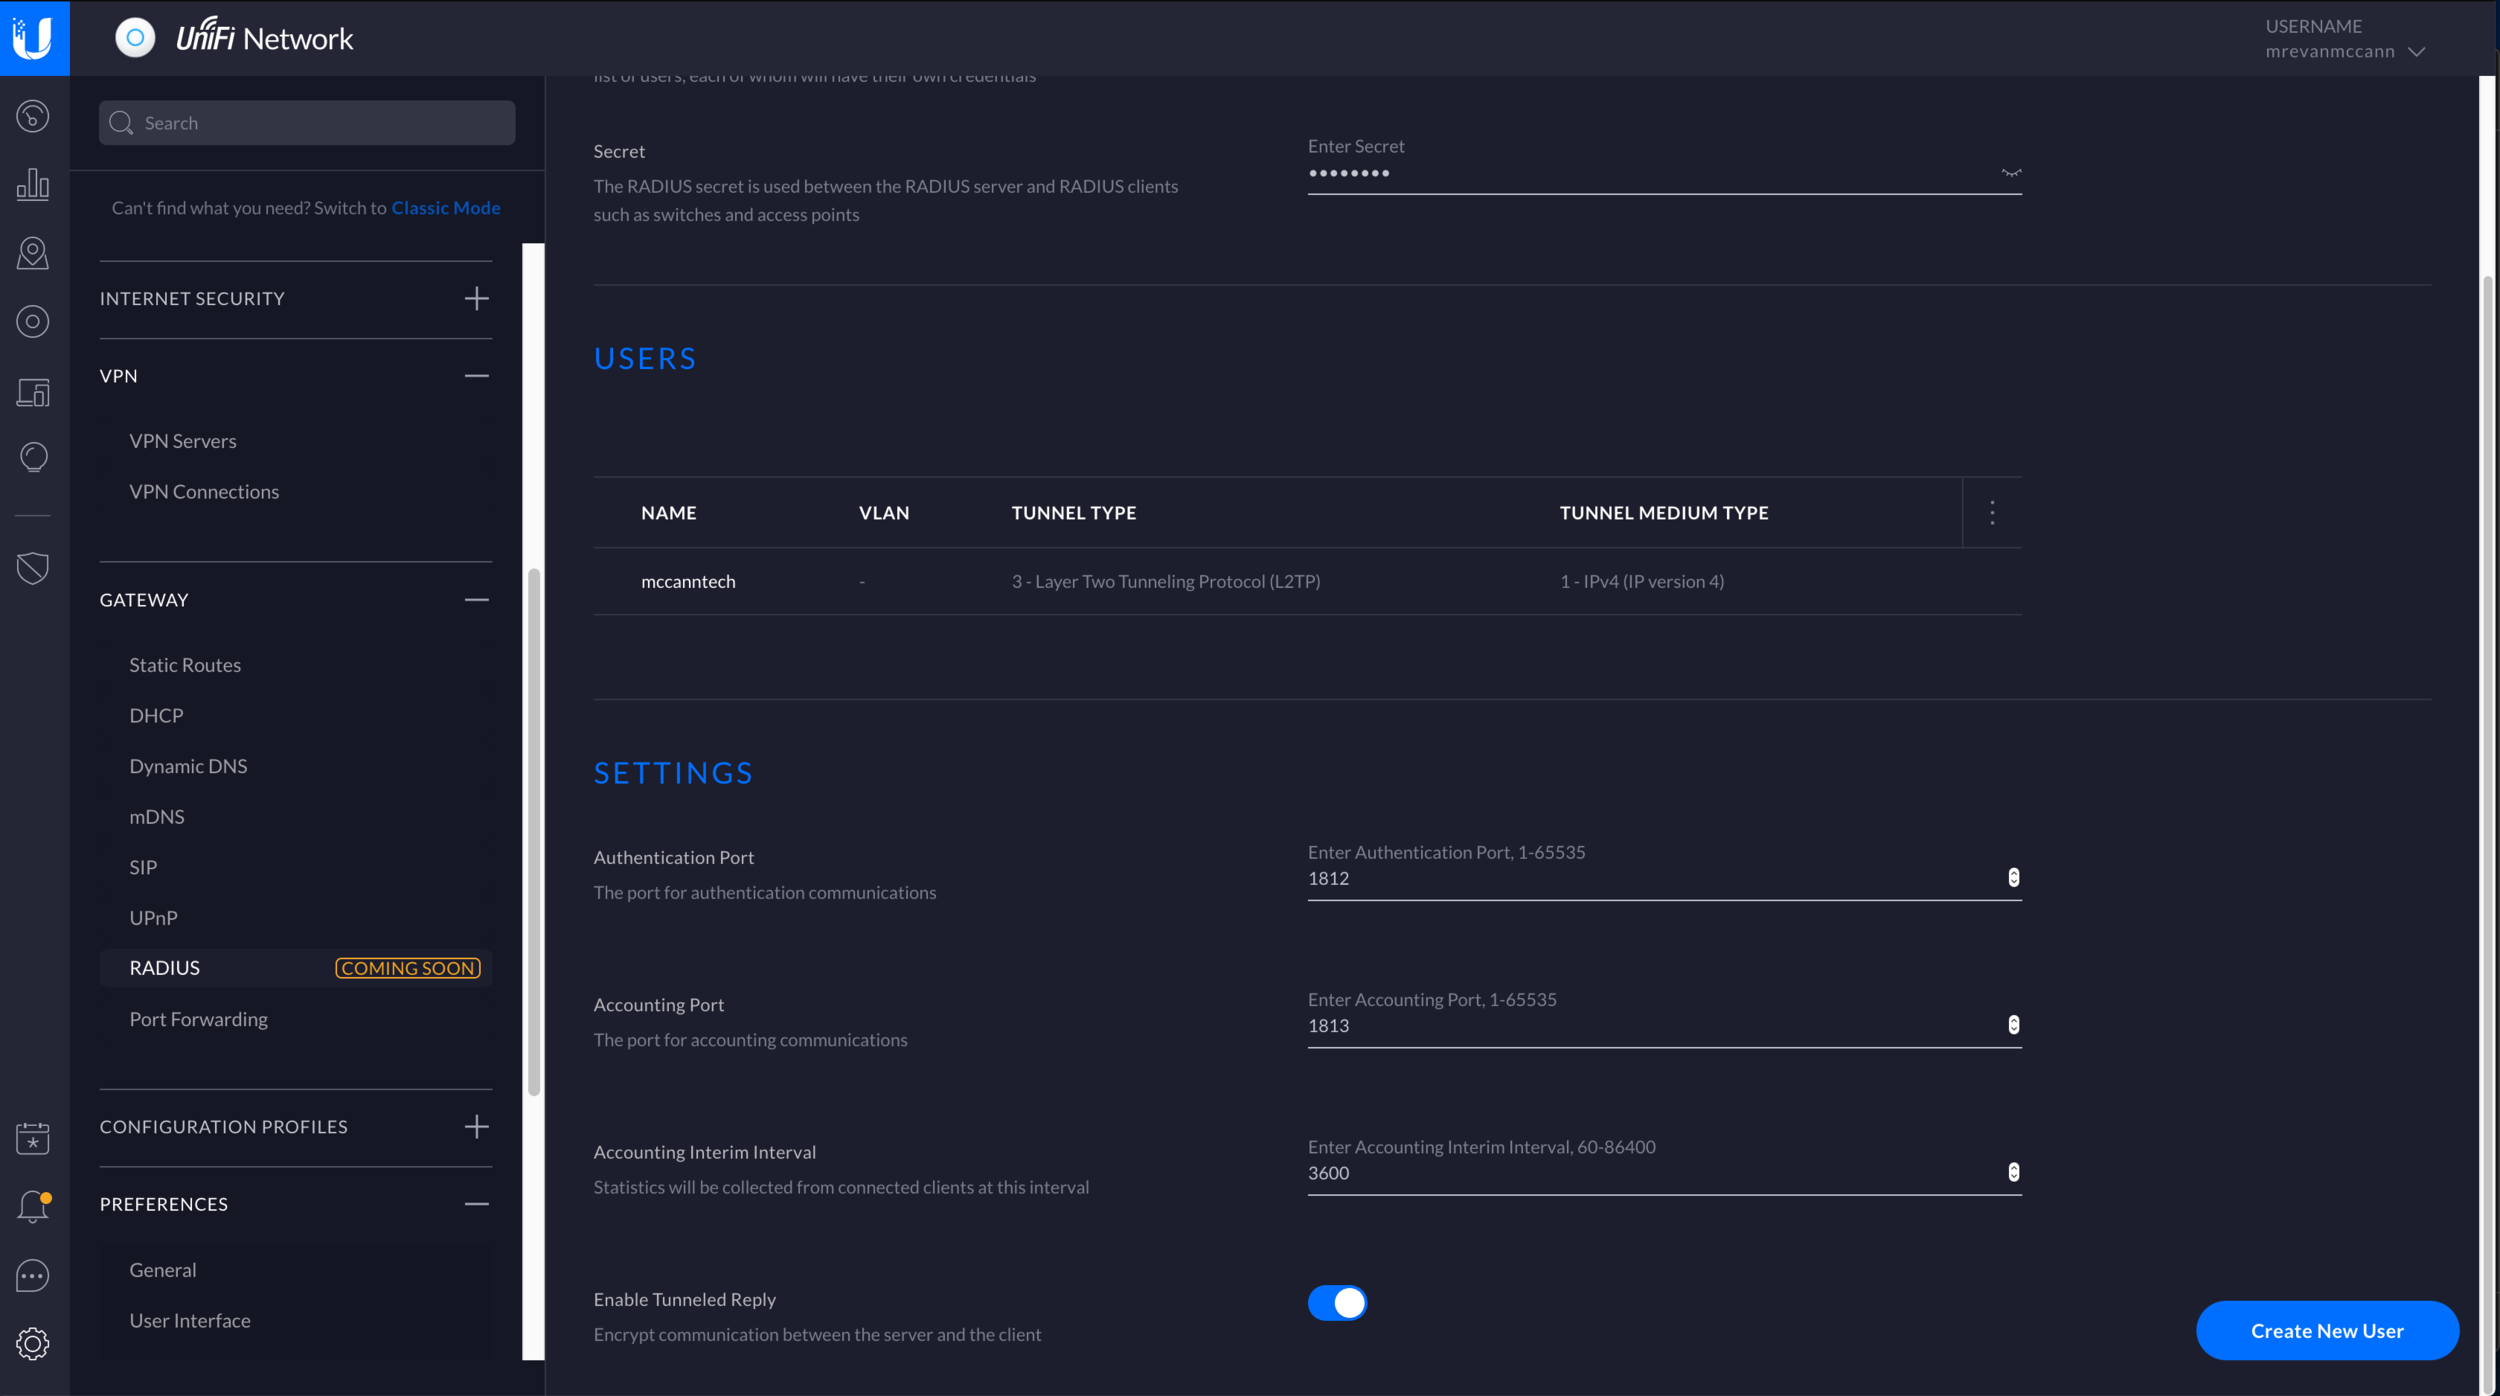
Under New Settings, Gateway, RADIUS:
-Turn on the RADIUS server, create a Secret, and turn on “Enable Tunneled Reply”
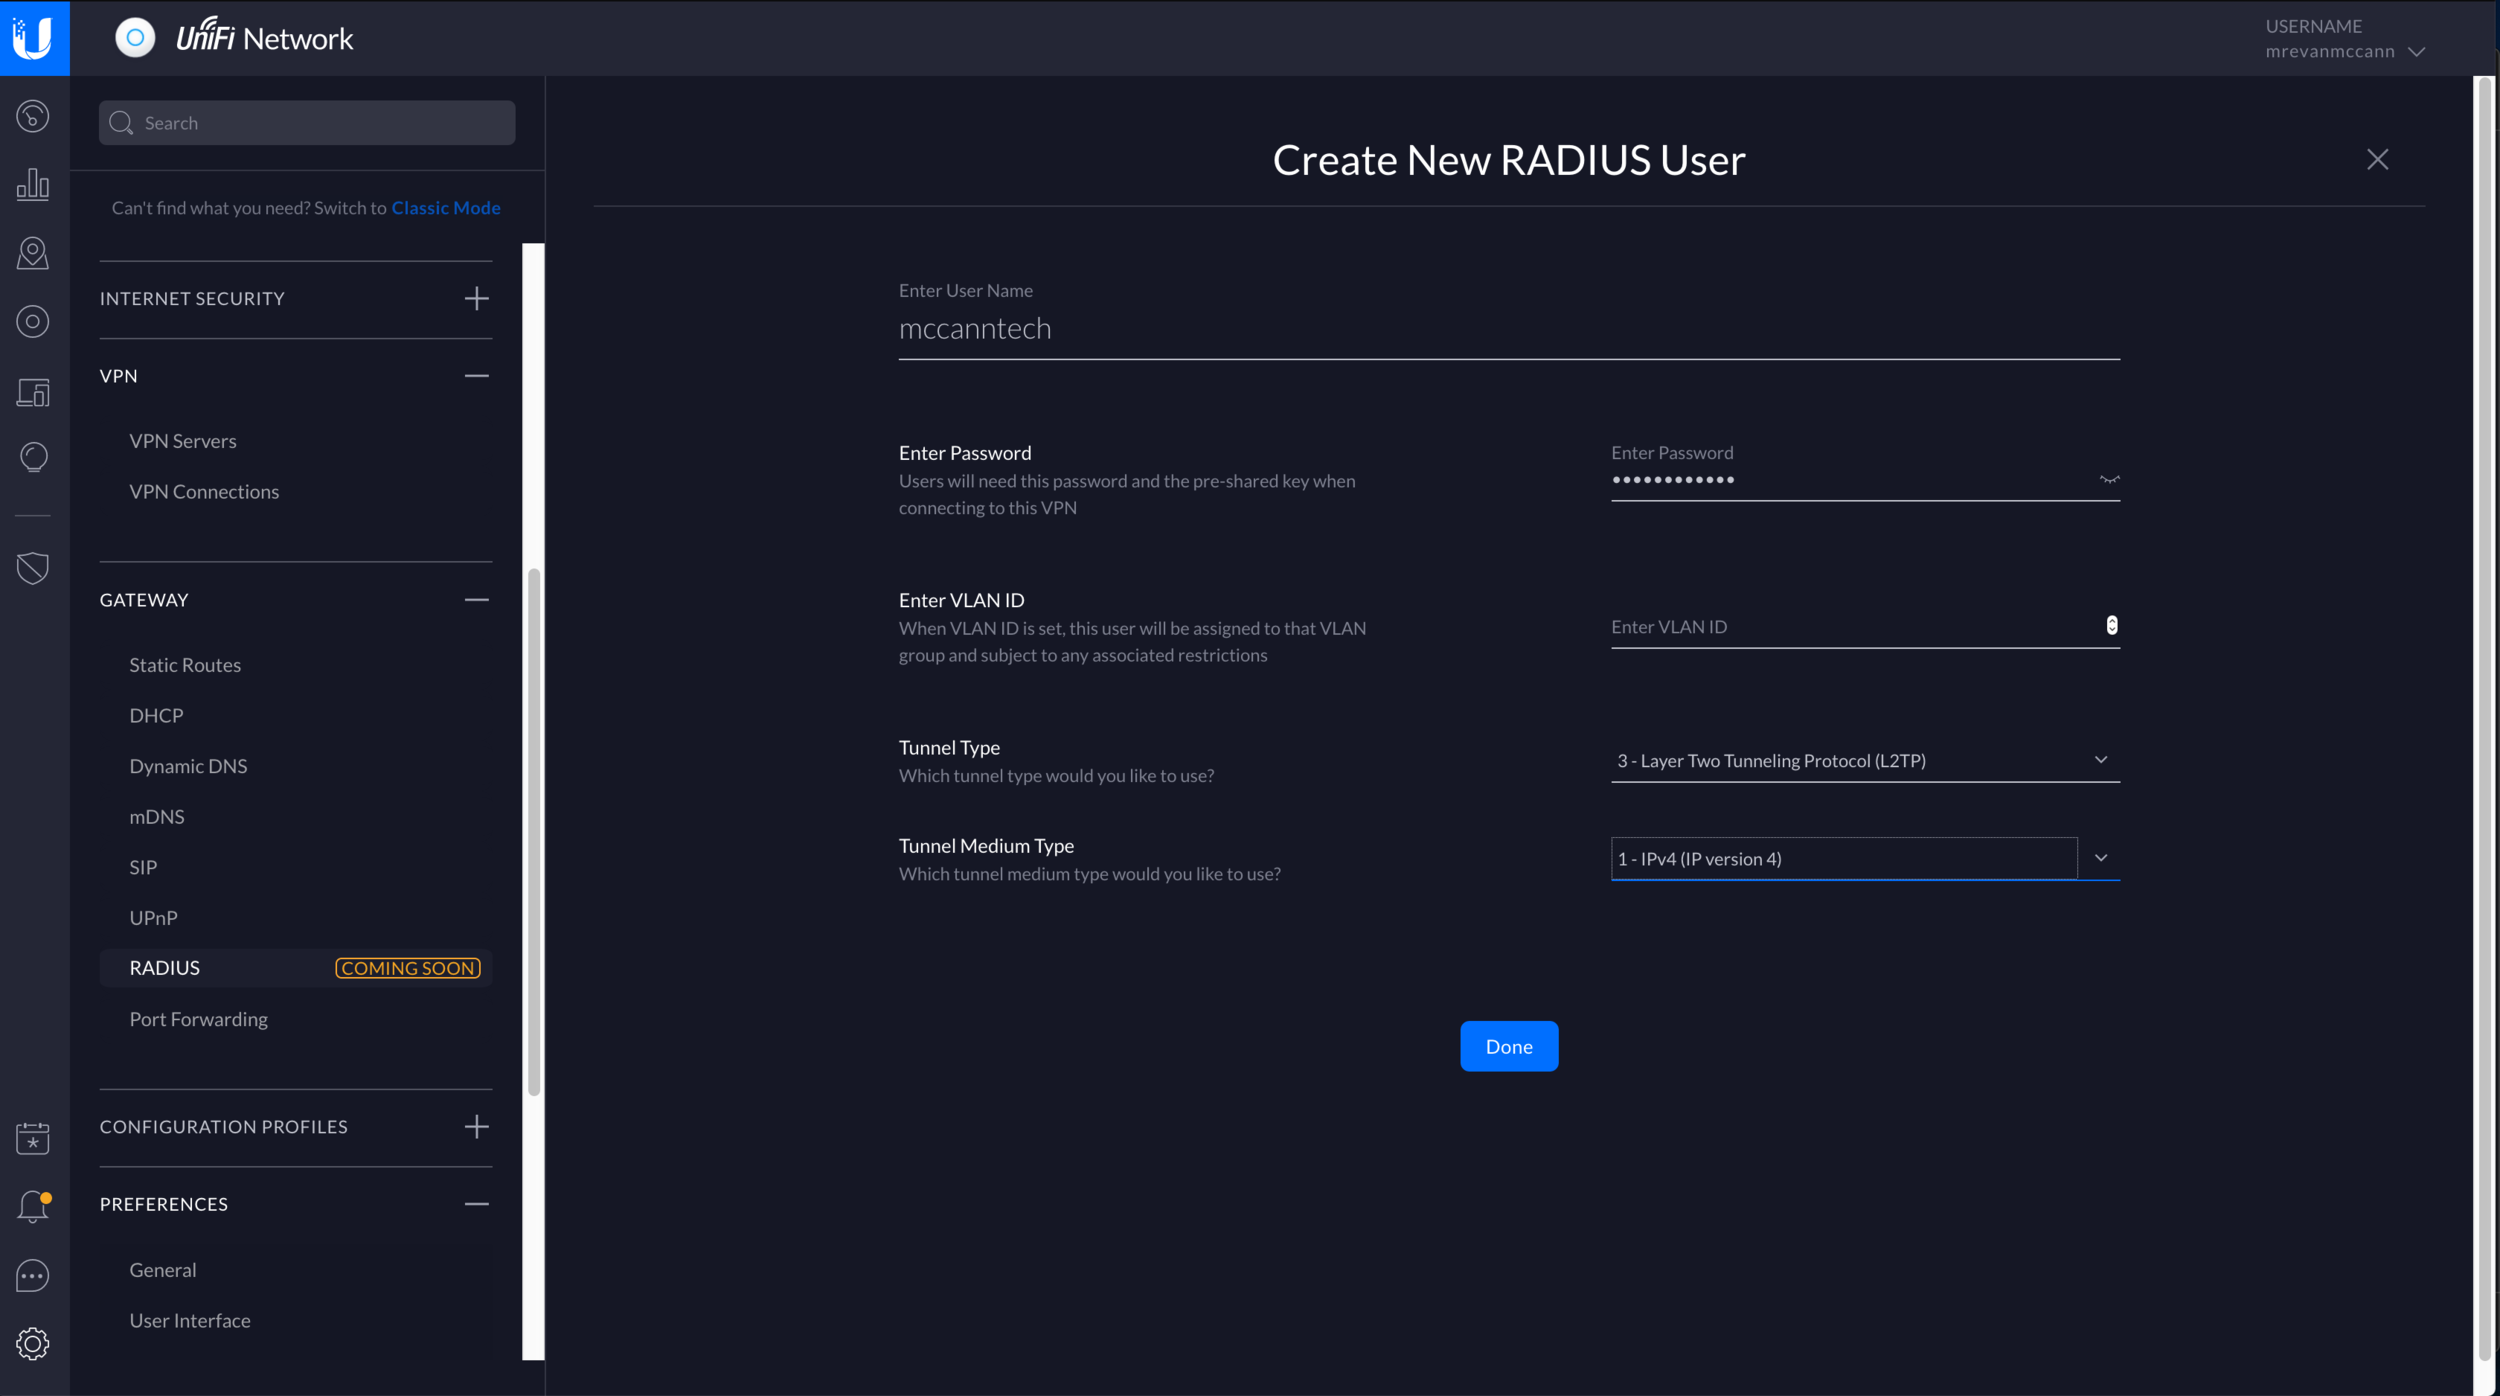
-Create a new RADIUS user
-Pick a username and password
-Assign a VLAN ID (optional)
-Pick Tunnel Type: “3 - Layer 2 Tunneling Protocol (L2TP)”
-Pick Tunnel Medium Type: “1- IPv4 IP version 4”
-Repeat for any additional users you want(Optional) Under New Settings, Configuration Profiles, RADIUS:
-Create new RADIUS profile. This will allows you to enable a RADIUS assigned VLAN for wired or wireless networks, and specify a RADIUS server if not using the UDM.
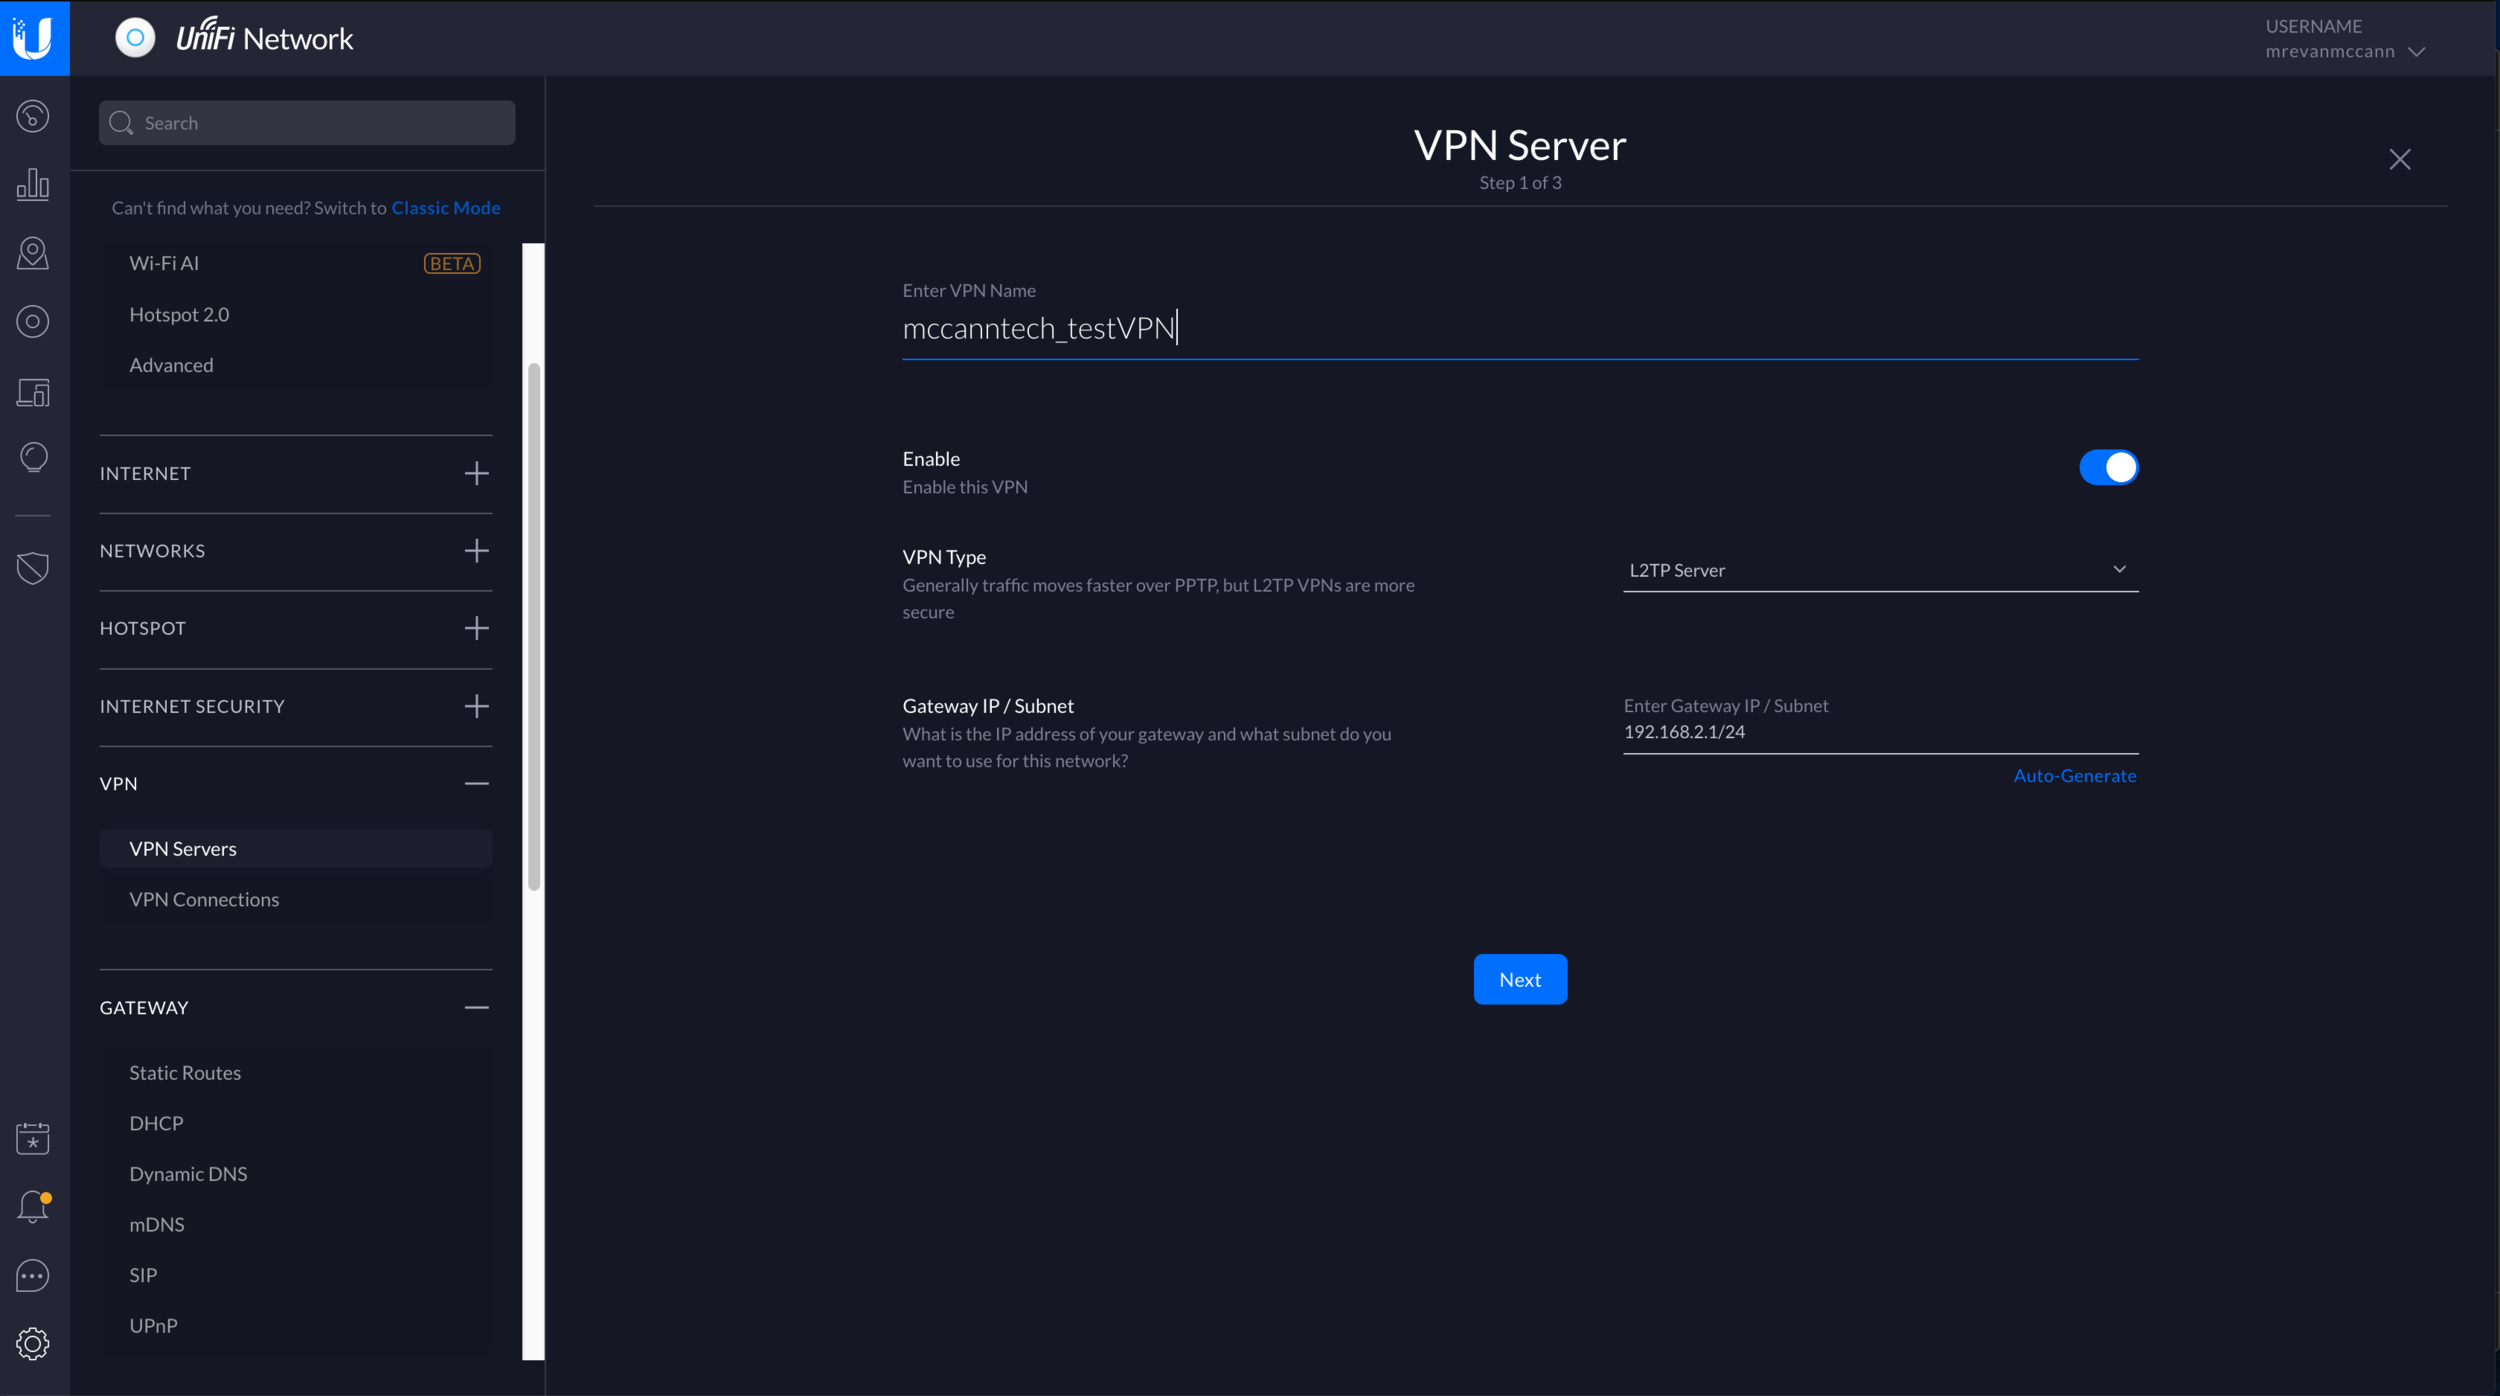
I did not test this. It’s OK to use the default profile for this purpose.Under New Settings, VPN, VPN Server:
-Select Create New VPN Server
-Select Create Advanced VPN
-Pick a VPN Name
-Make sure the VPN is enabled
-Set VPN Type to: L2TP Server
-Pick an IP subnet to use. The IP subnet cannot overlap with one of your existing networks.
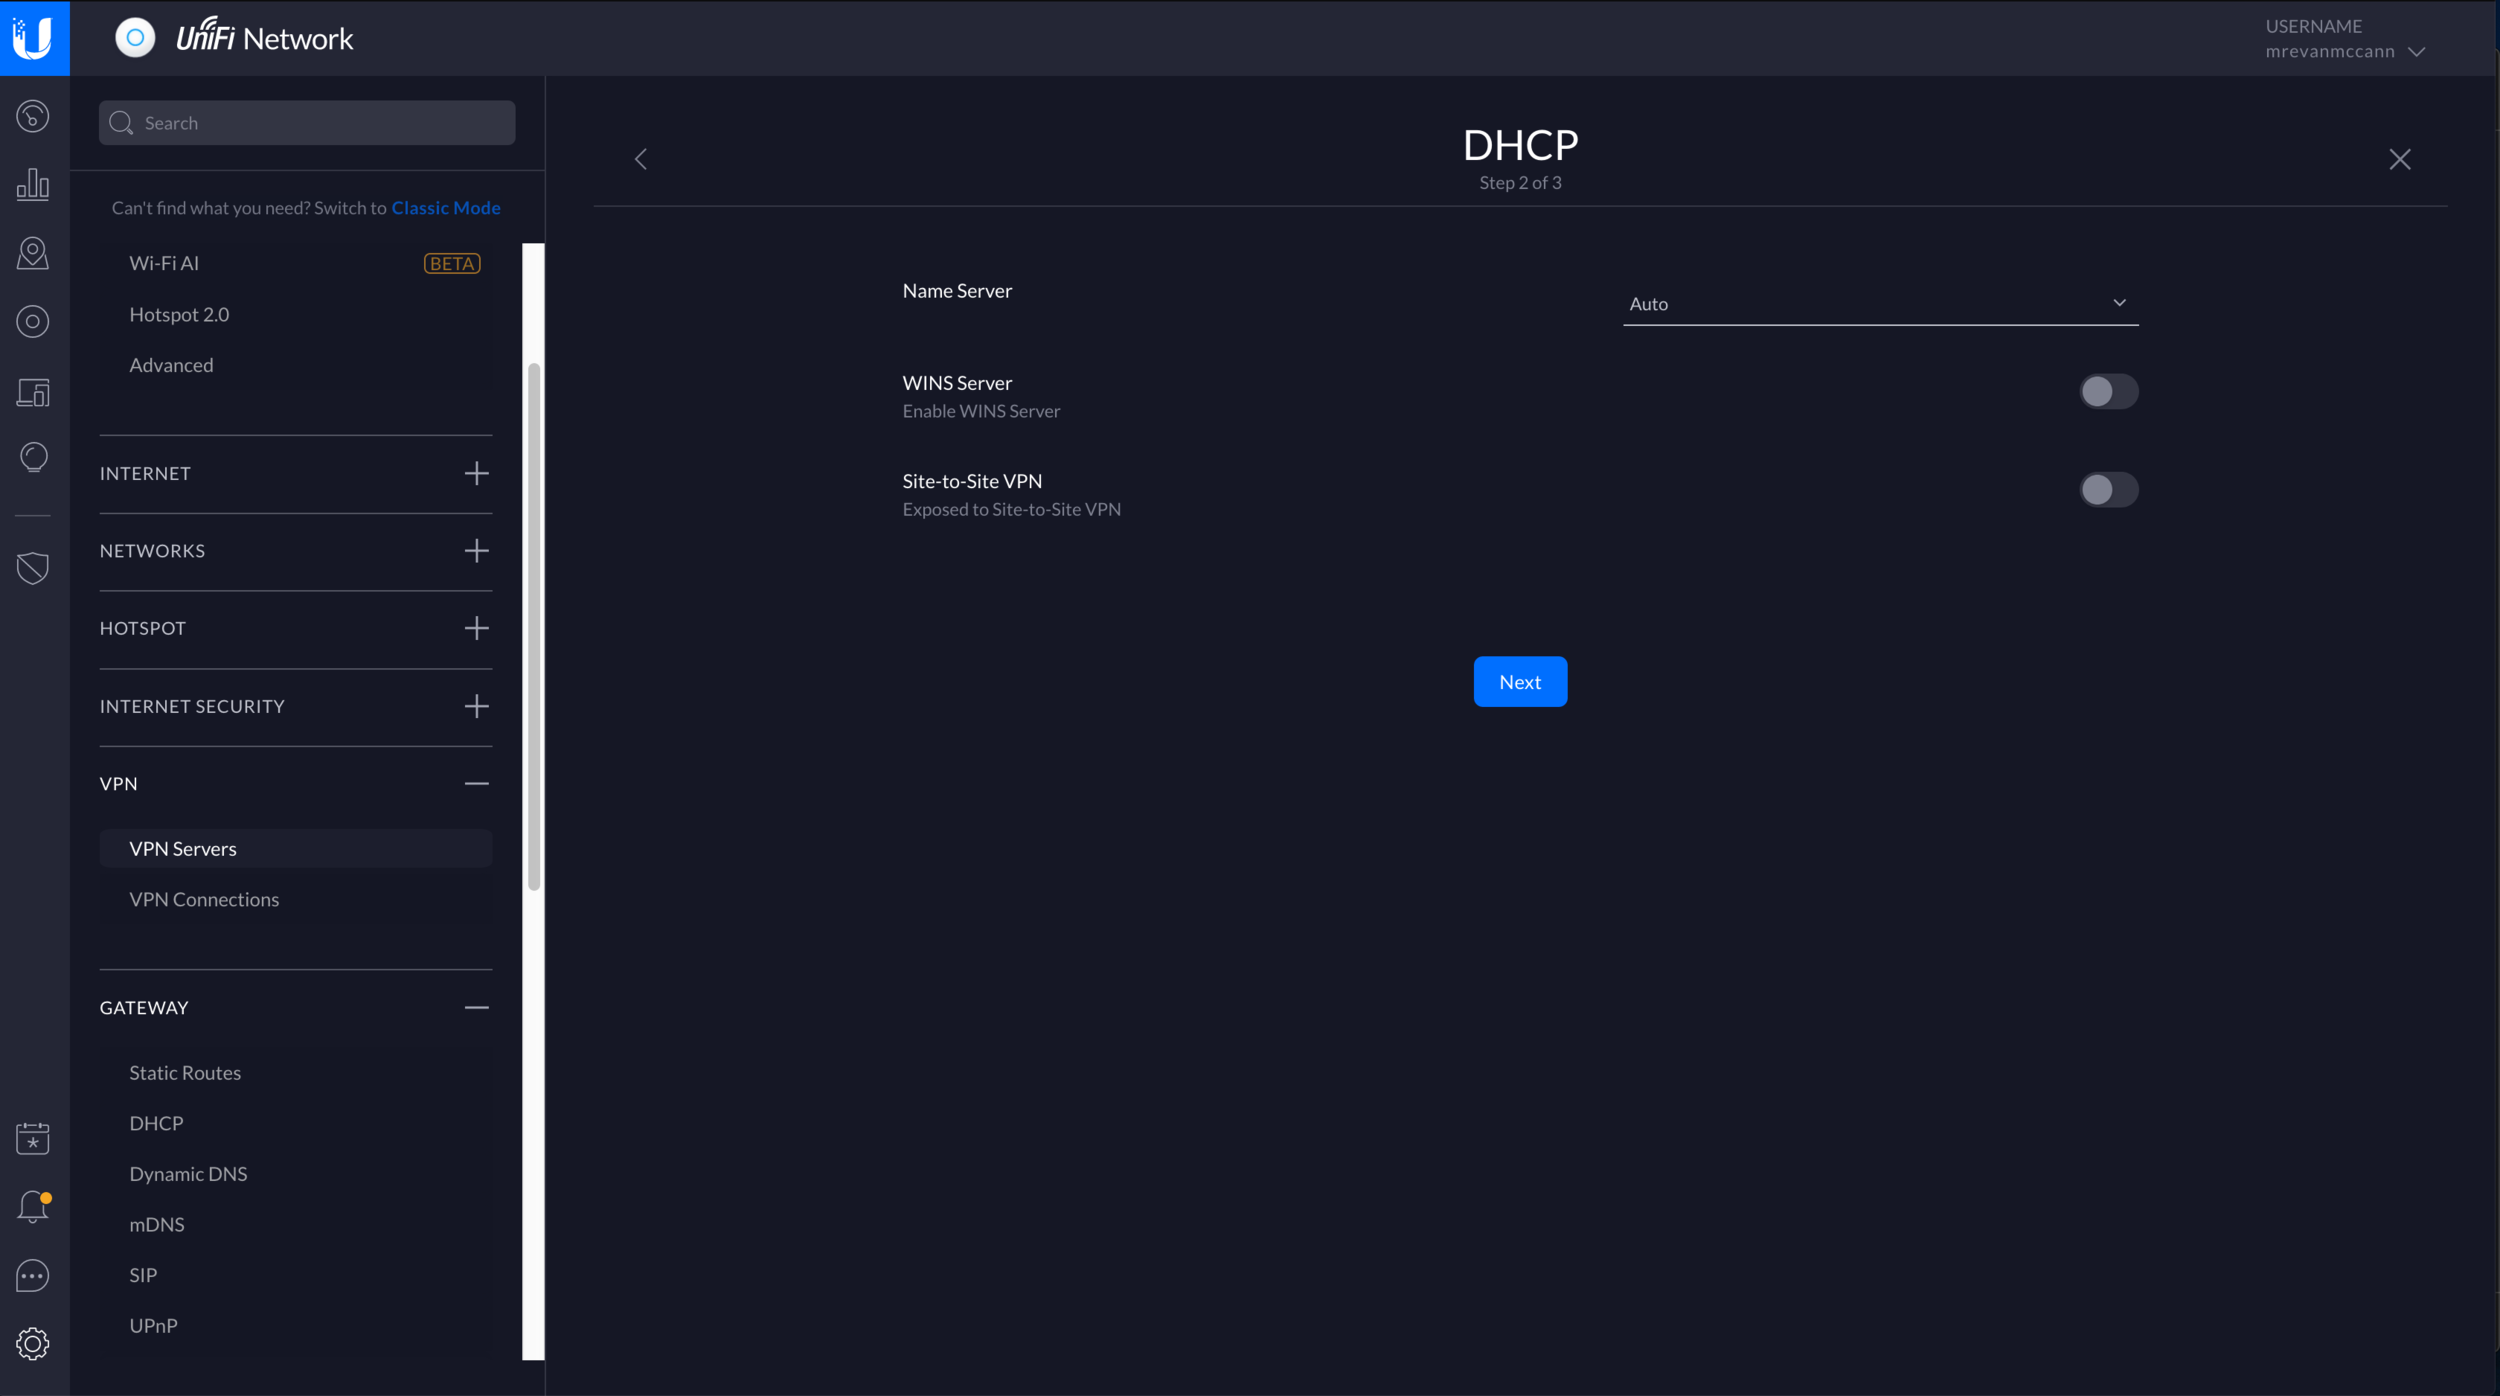
-Pick a DNS name server if needed (specify an internal or external DNS server by IP)
-Enable WINS if needed (legacy Microsoft name server and service for NetBIOS computer names)
-Allow Site-to-Site VPNs to access this network if needed.The VPN has been created
I tested connecting via the cell network of my iPhone. Ubiquiti’s site has instructions for macOS and Windows. That process is similar.
-On an iPhone, open Settings -> General -> VPN -> Add VPN Configuration
-Change type to L2TP and enter description
-Enter server address. This is the public, routable WAN IP of your UDM. This can be found under Controller settings -> Dream Machine. To my understanding, a public IP is required for this.
-Account is the RADIUS username
-Password is the RADIUS password
-Secret is the RADIUS secret
-Hit done, go back to the VPN menu and try to connect.

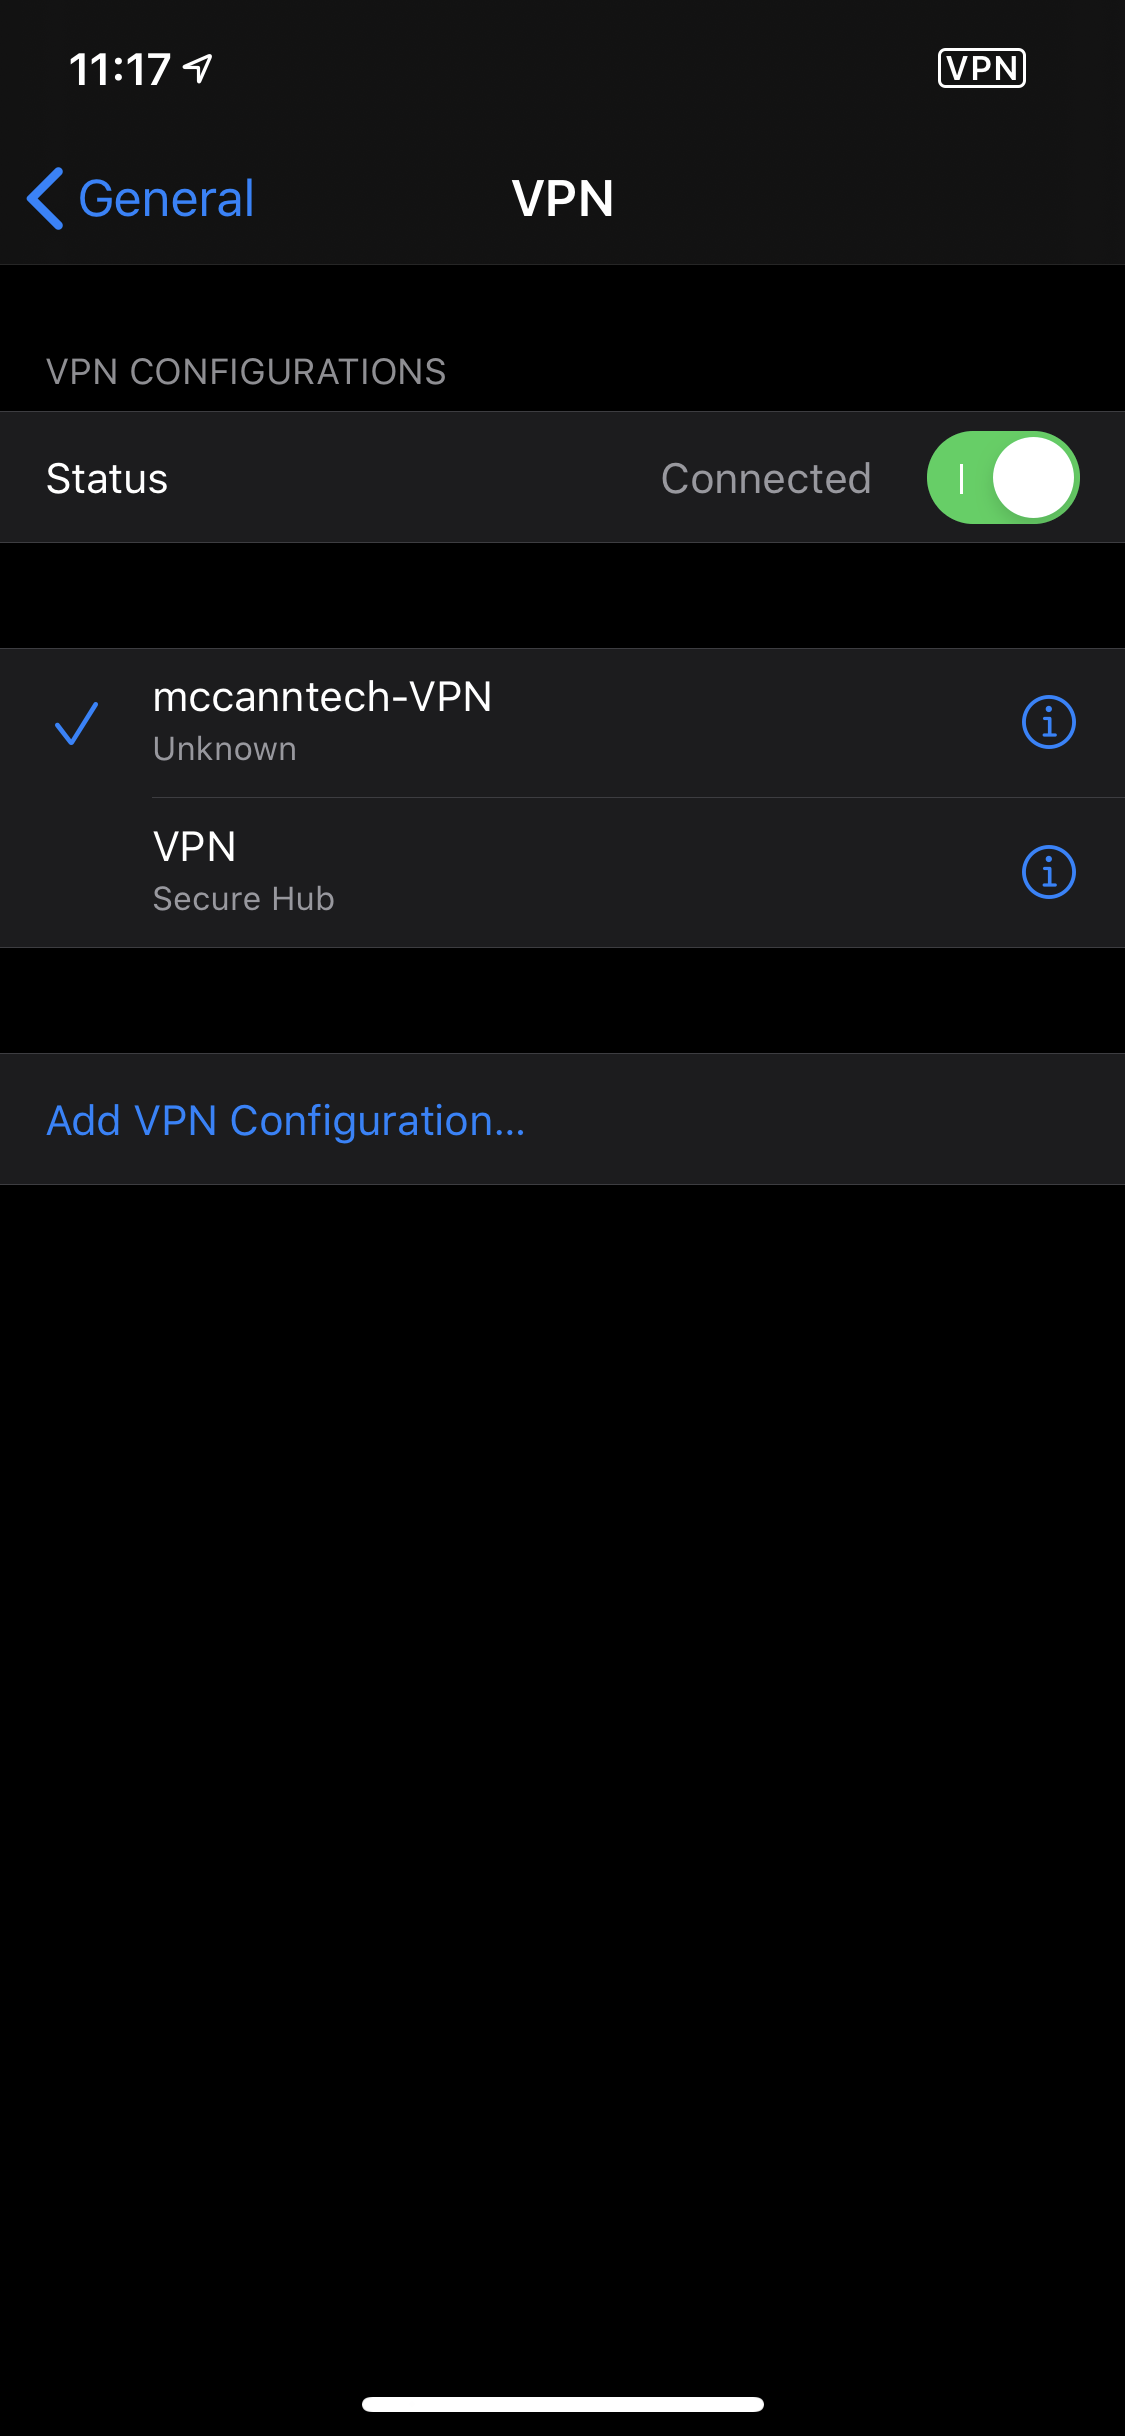
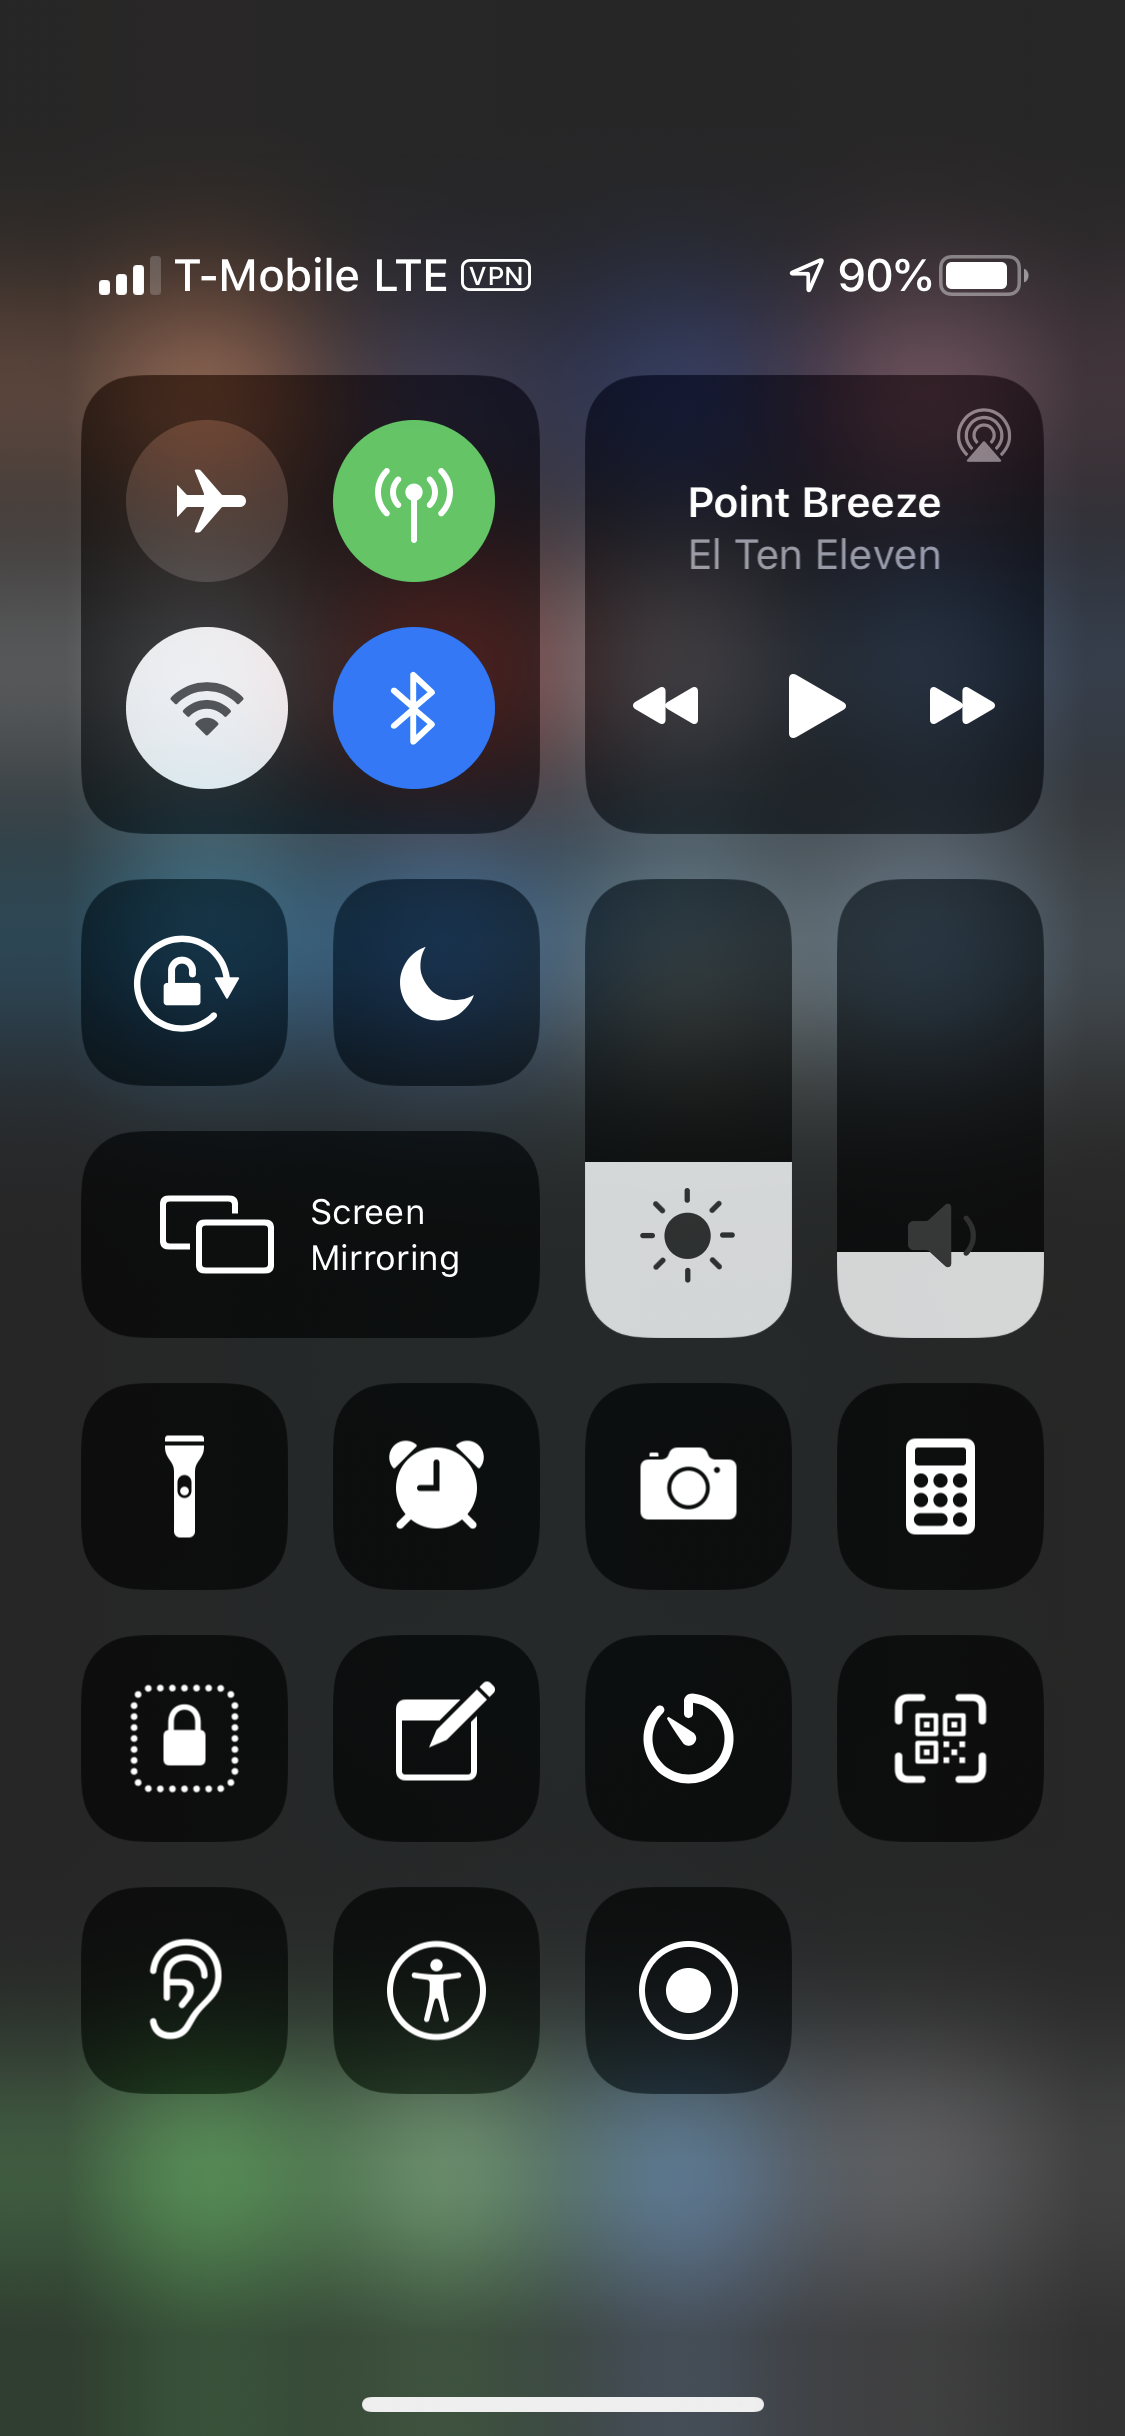
With the remote access VPN enabled on my phone, I am able to access the local network of my house from anywhere. If you are planning on using this, I’d recommend locking down access with a secure password, and adding some firewall rules to restrict access to remote users. Kiril Peyanski has a good overview of the VPN setup with Windows, iOS and macOS client configurations in his review of the things that no one told you about the UDM.
UniFi Dream Machine Benefits and Features
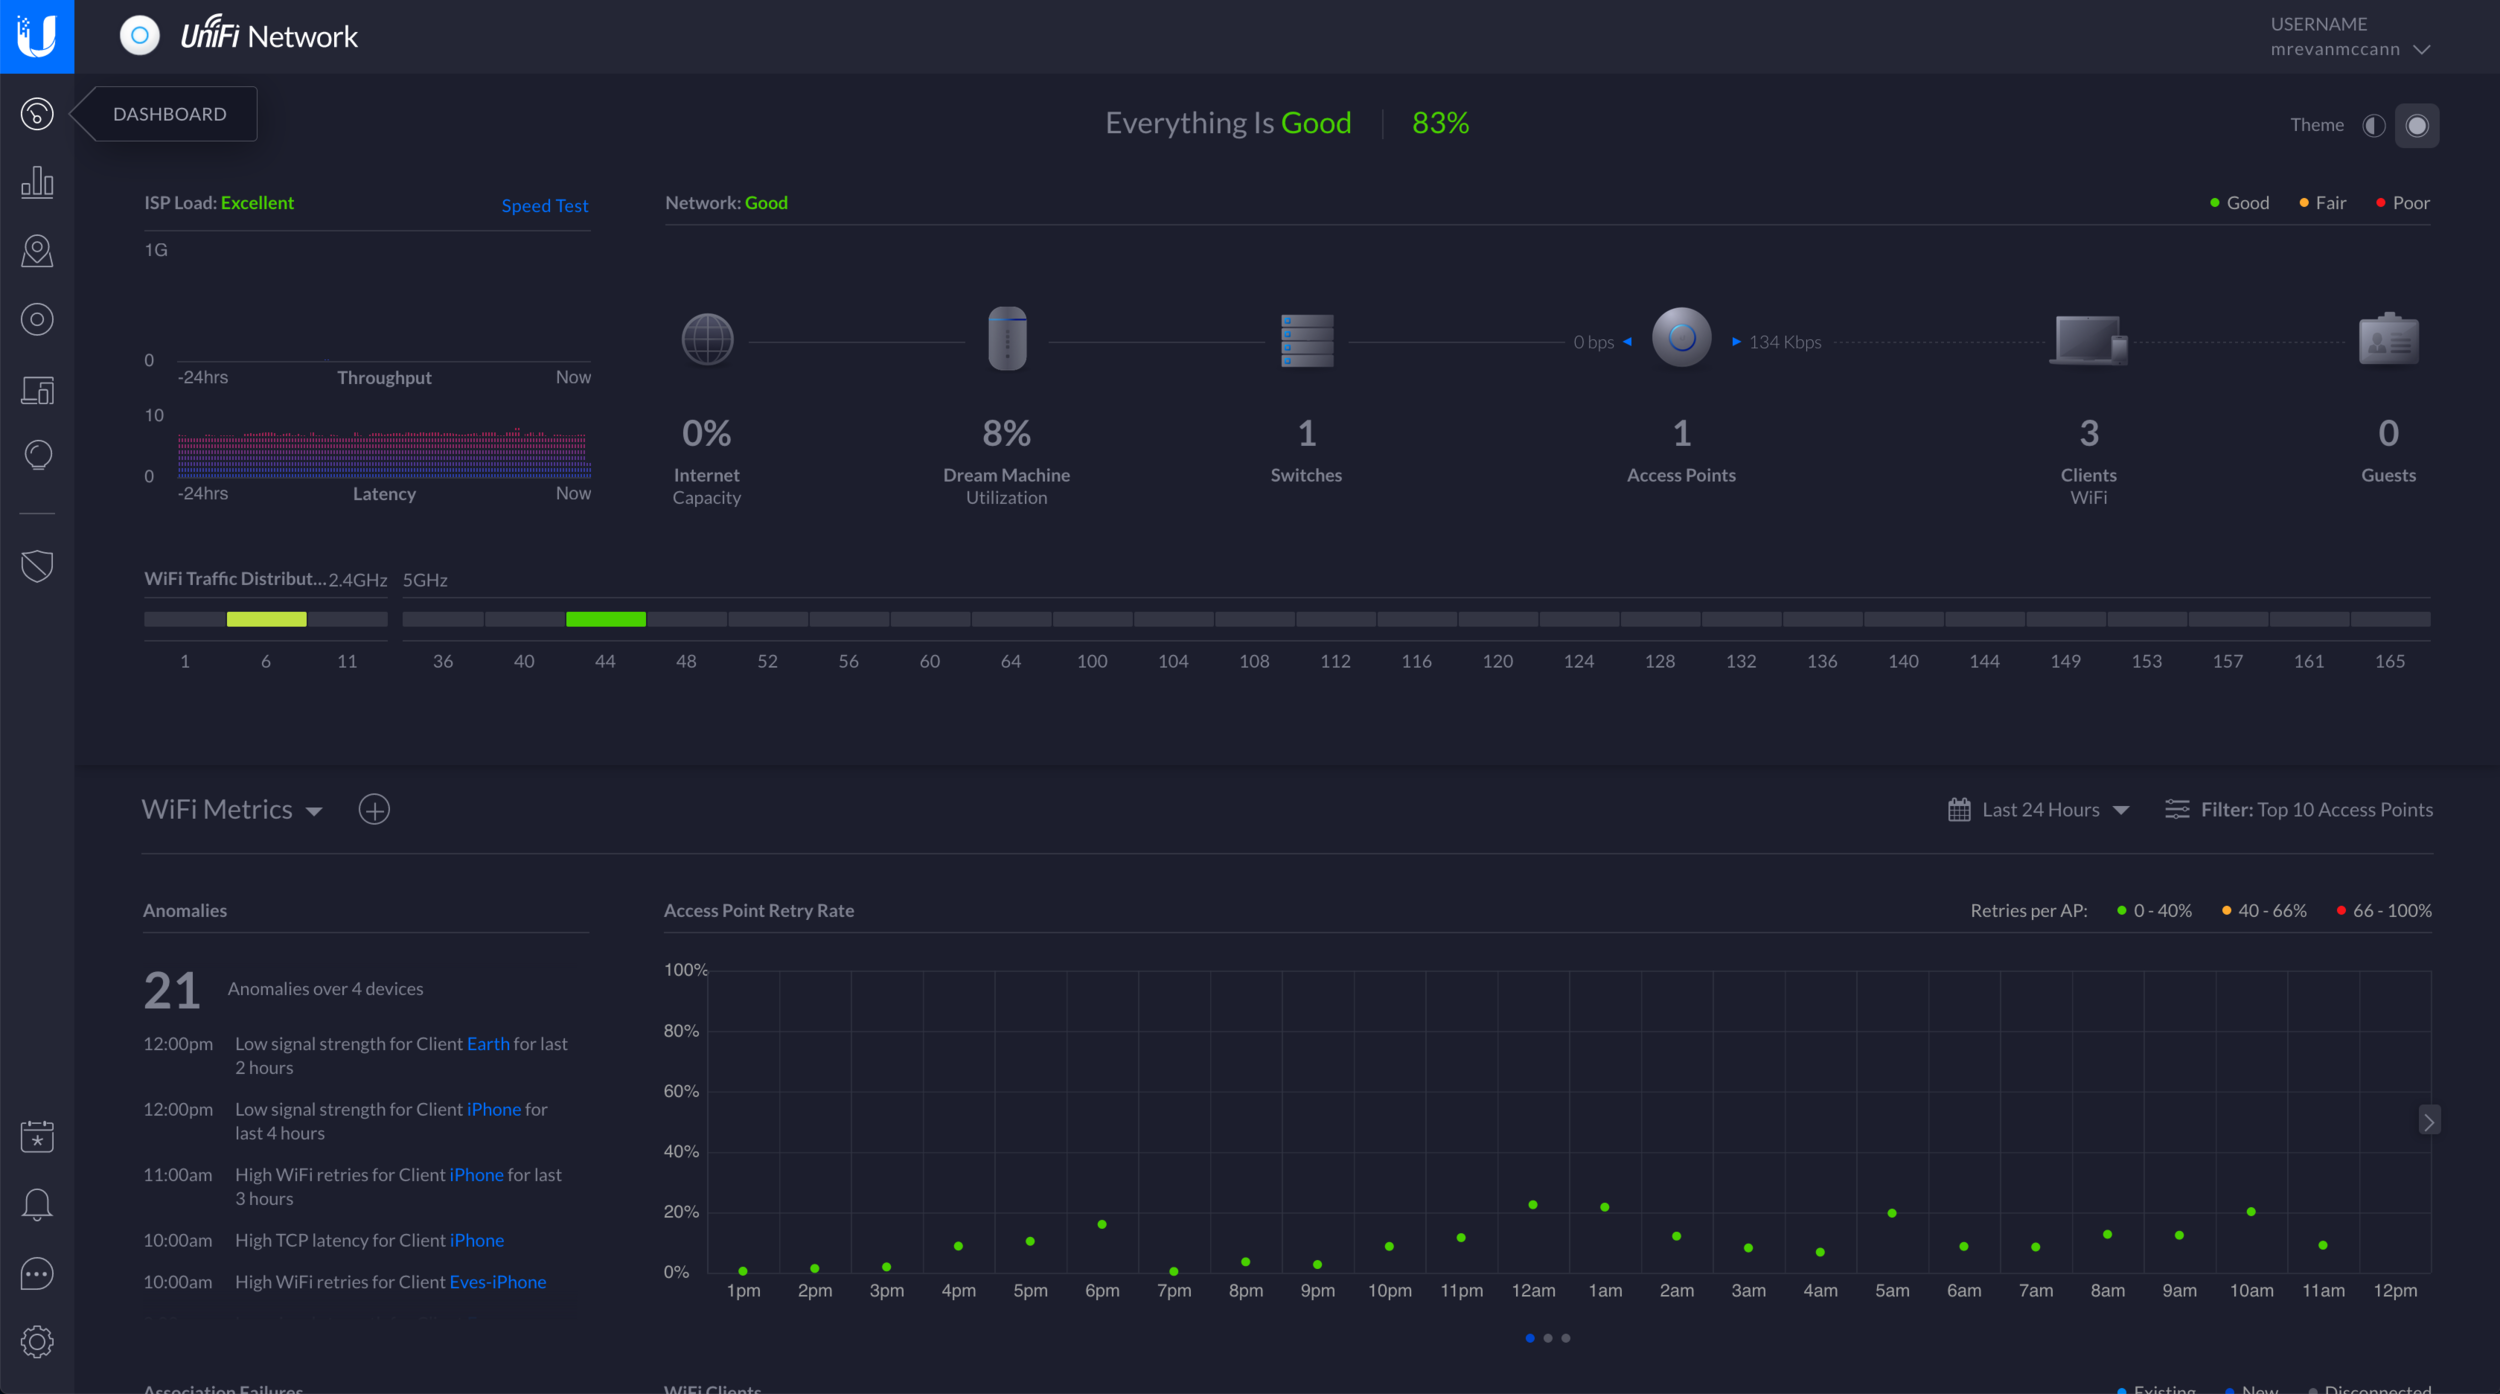
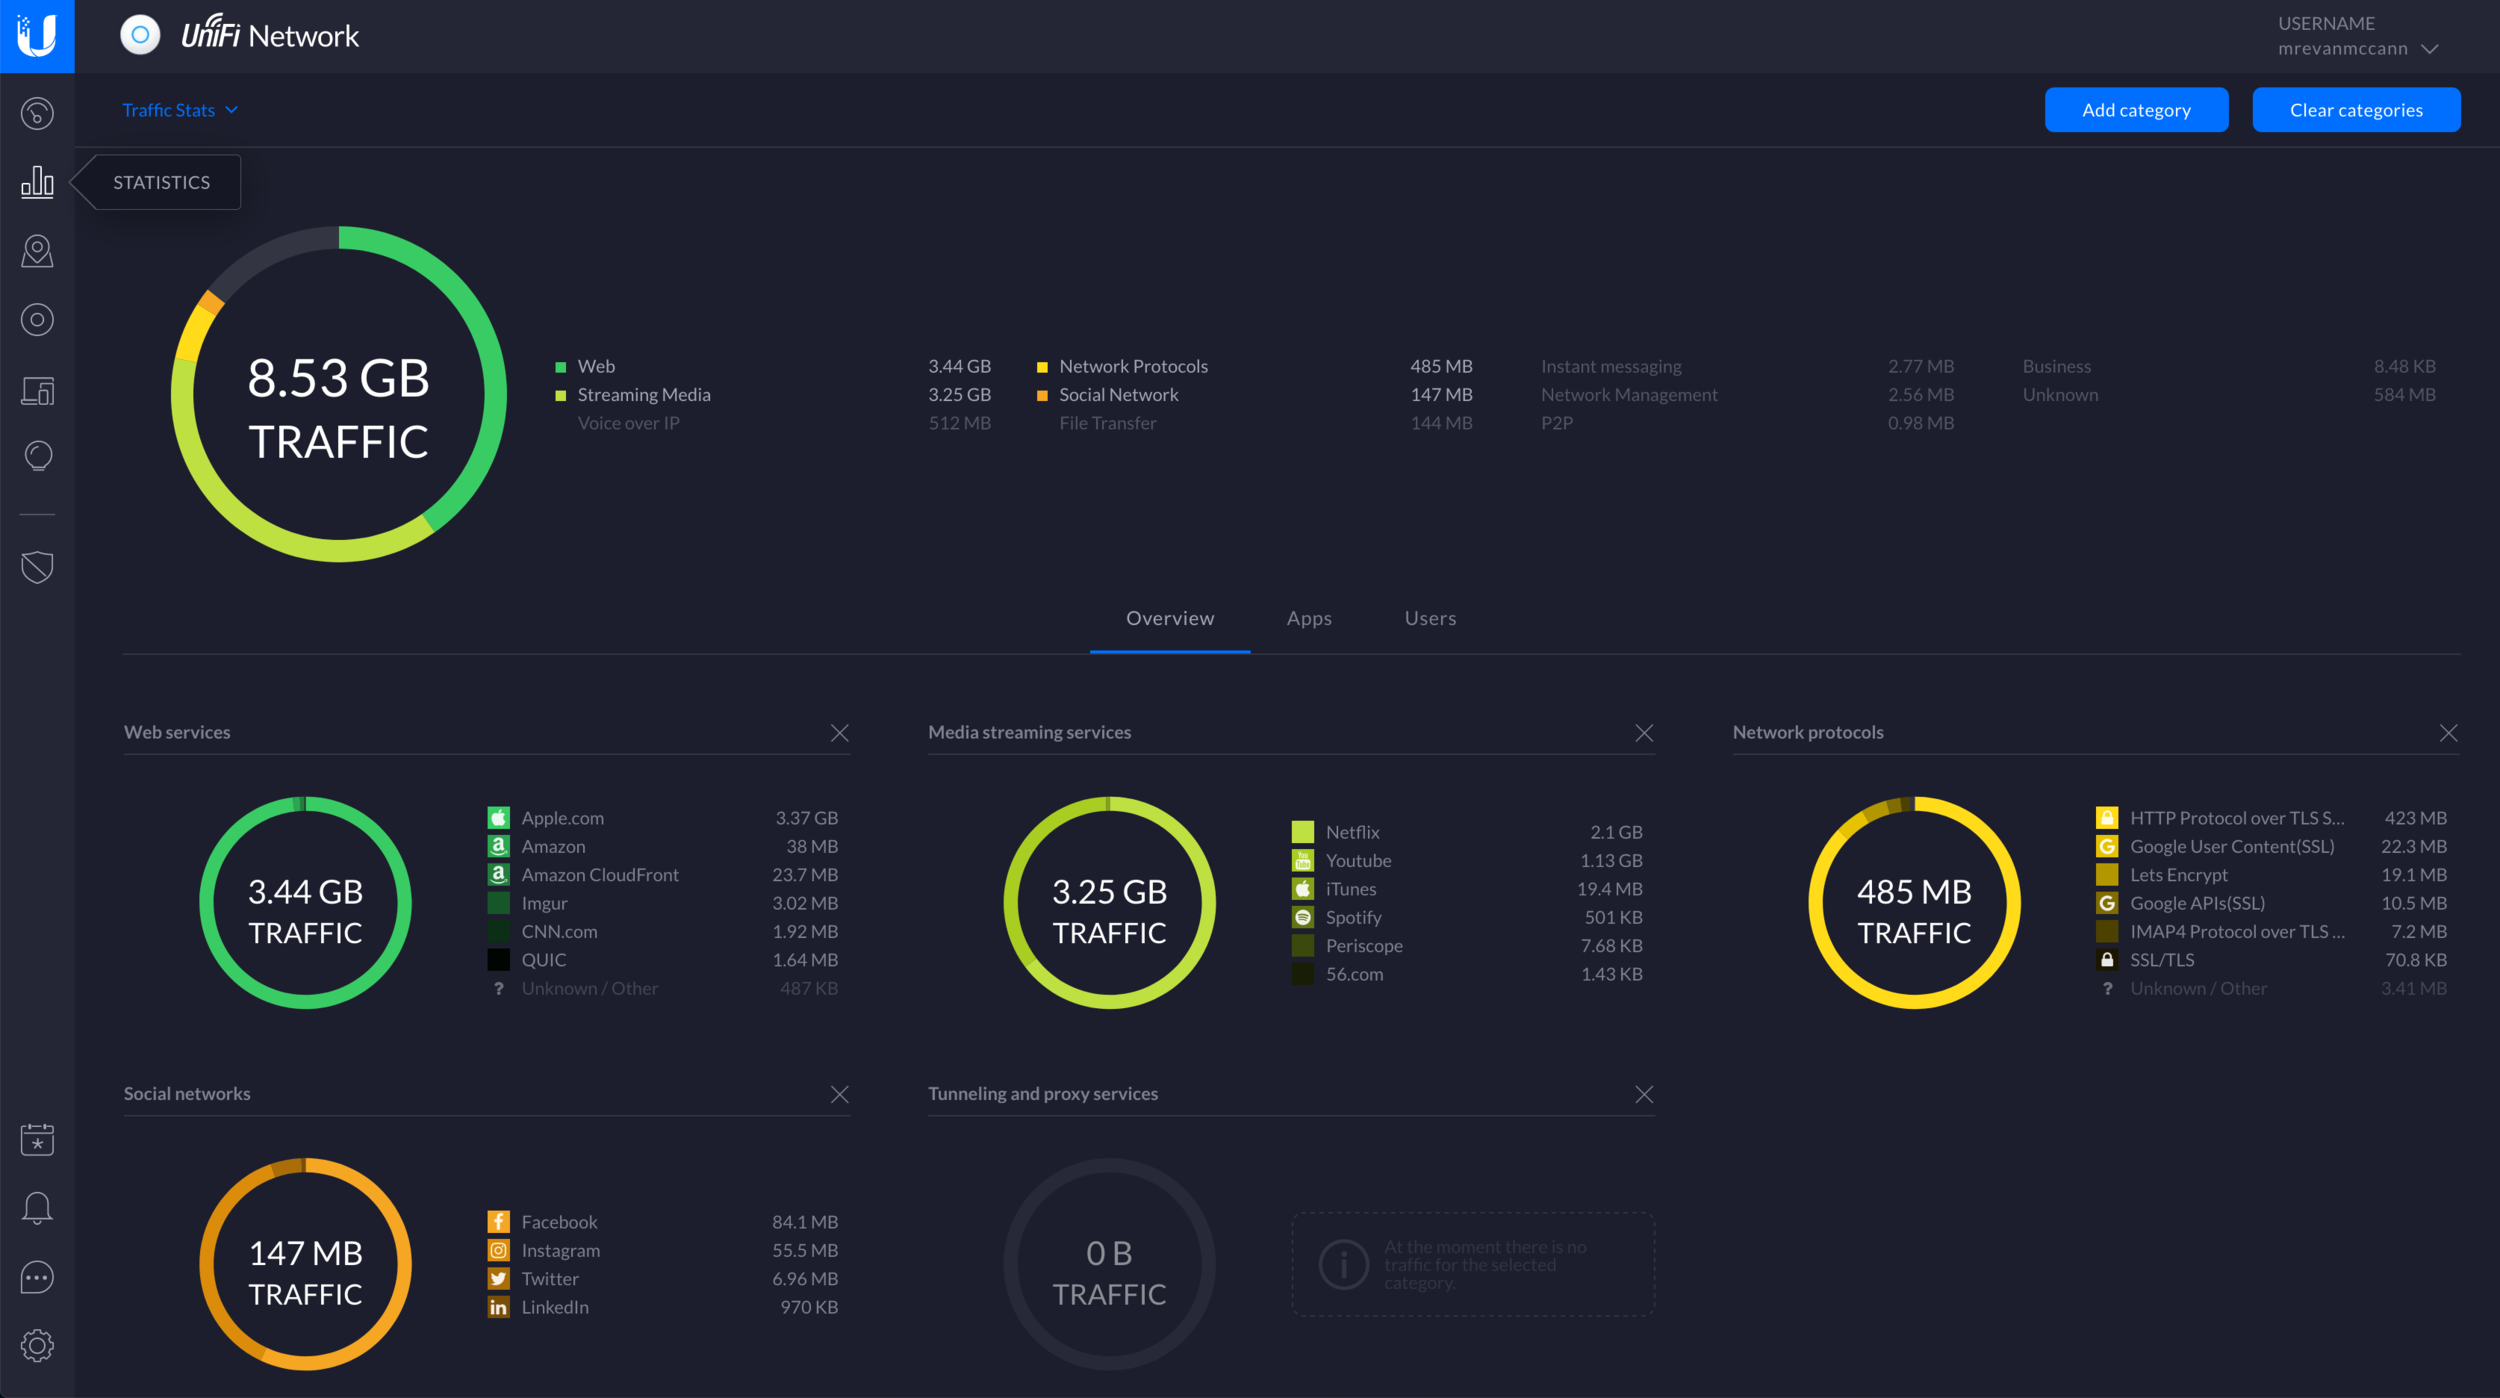
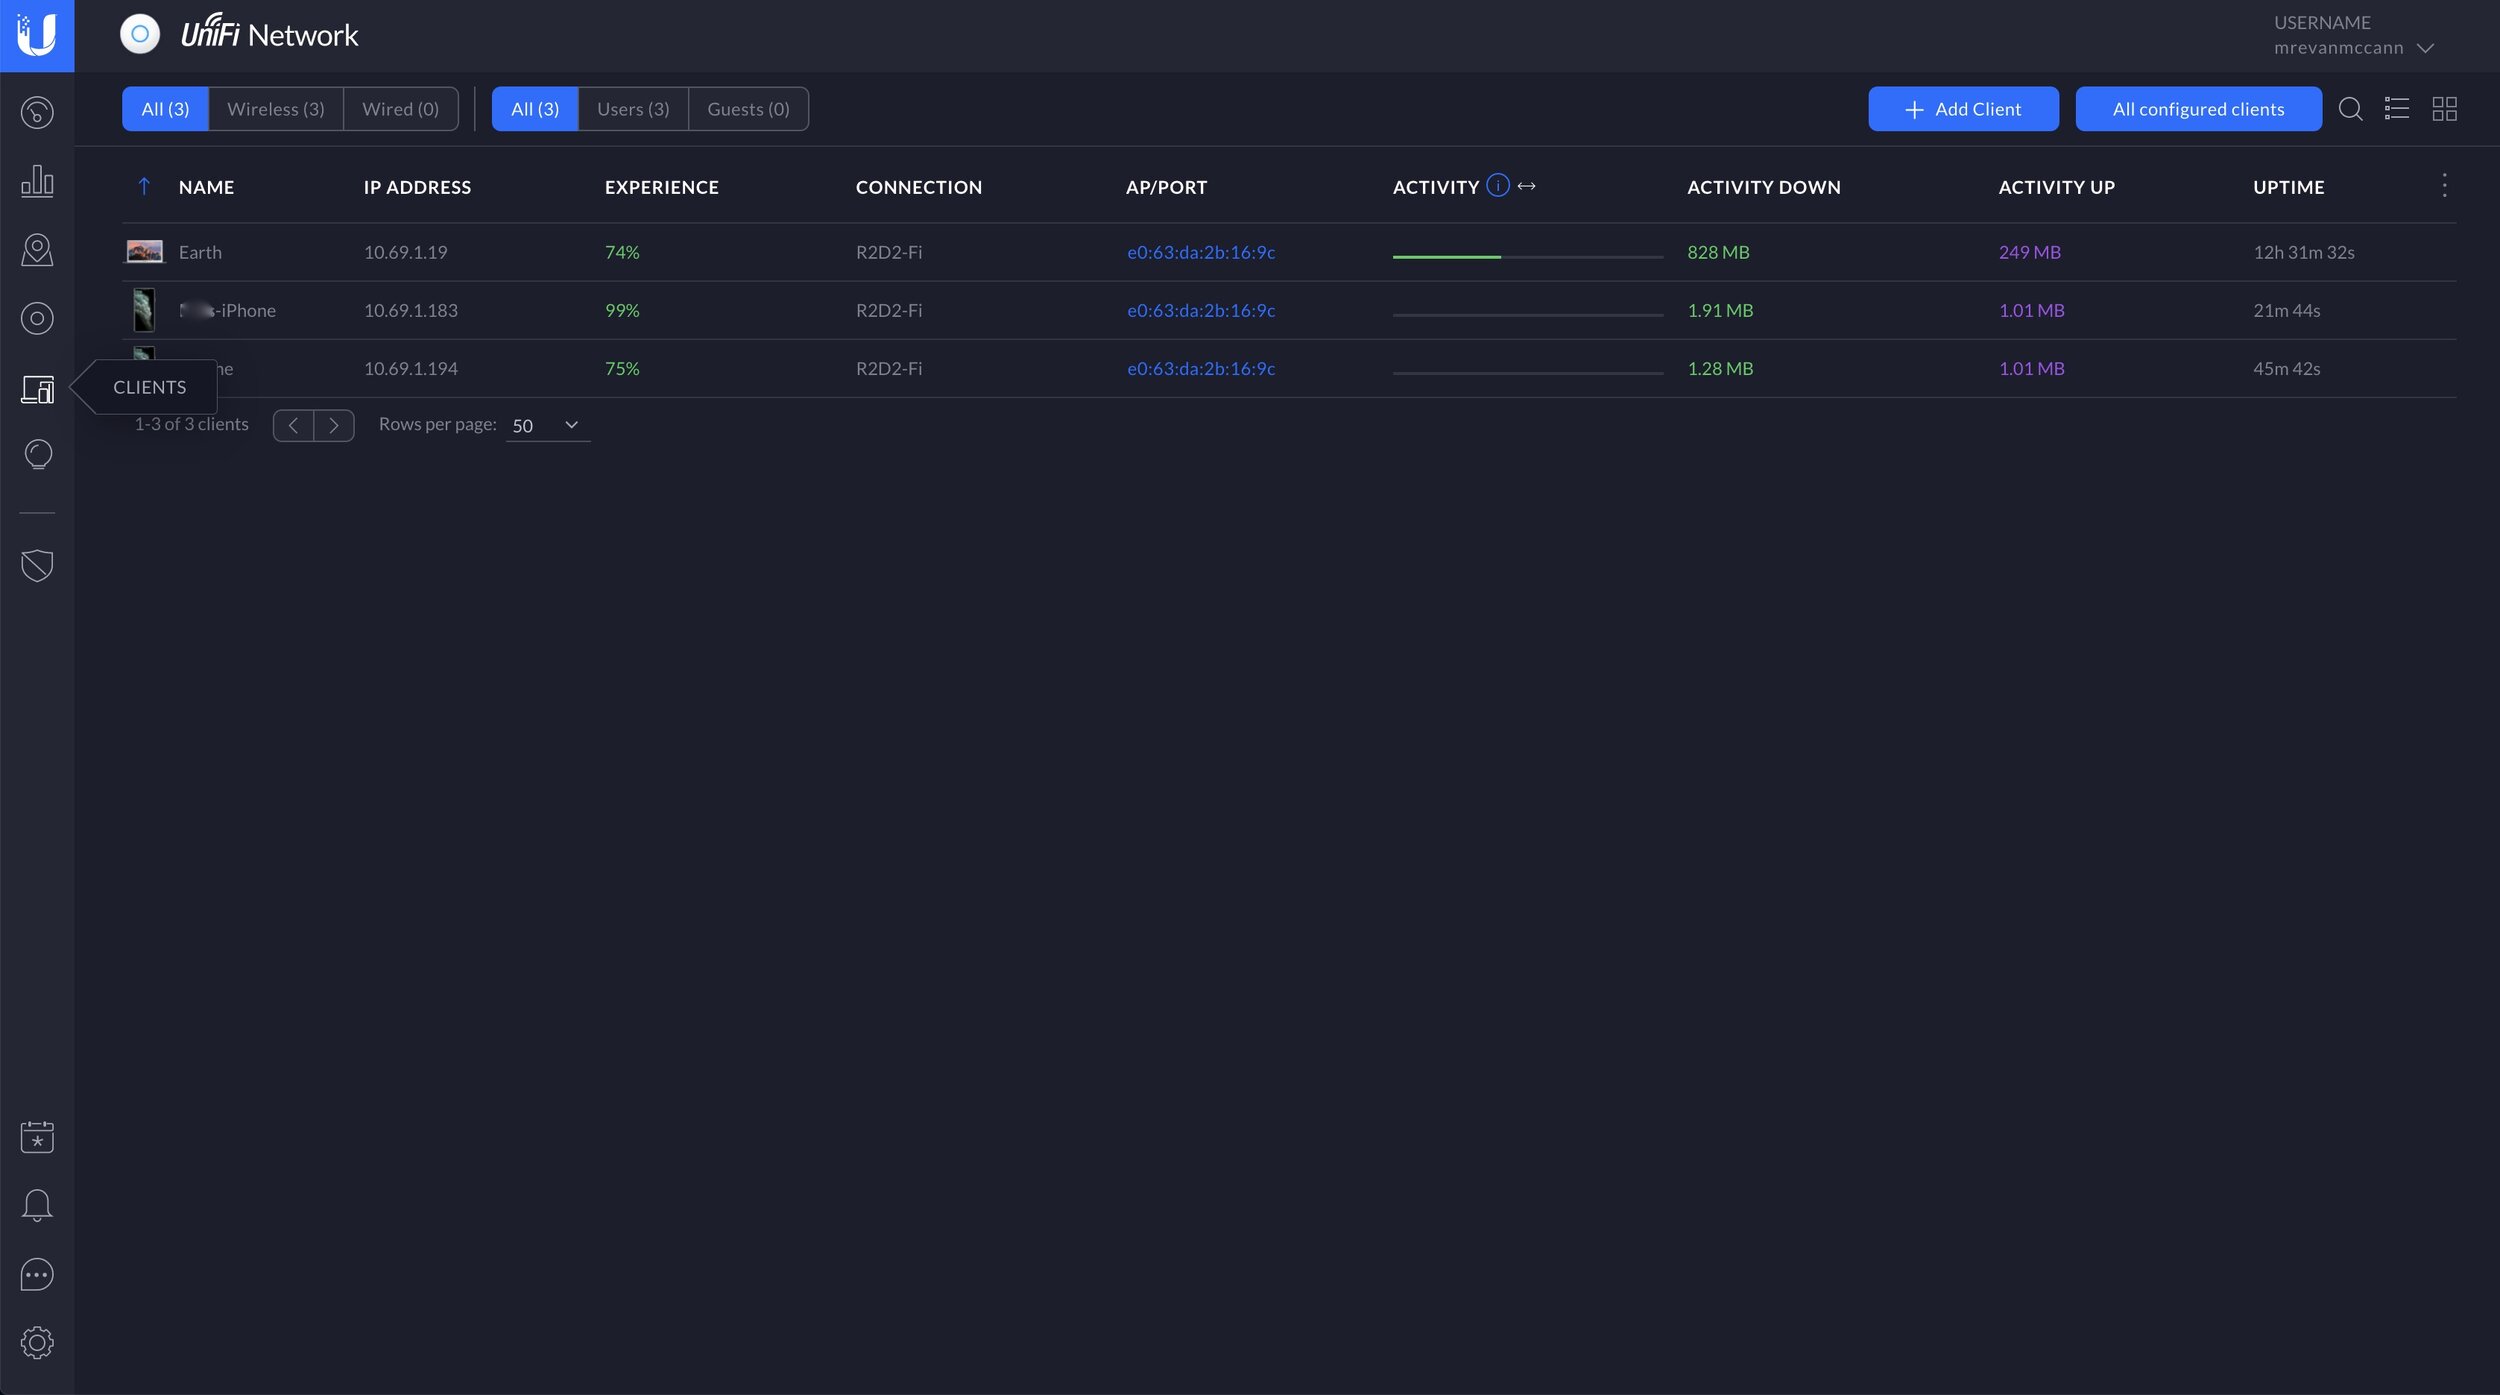
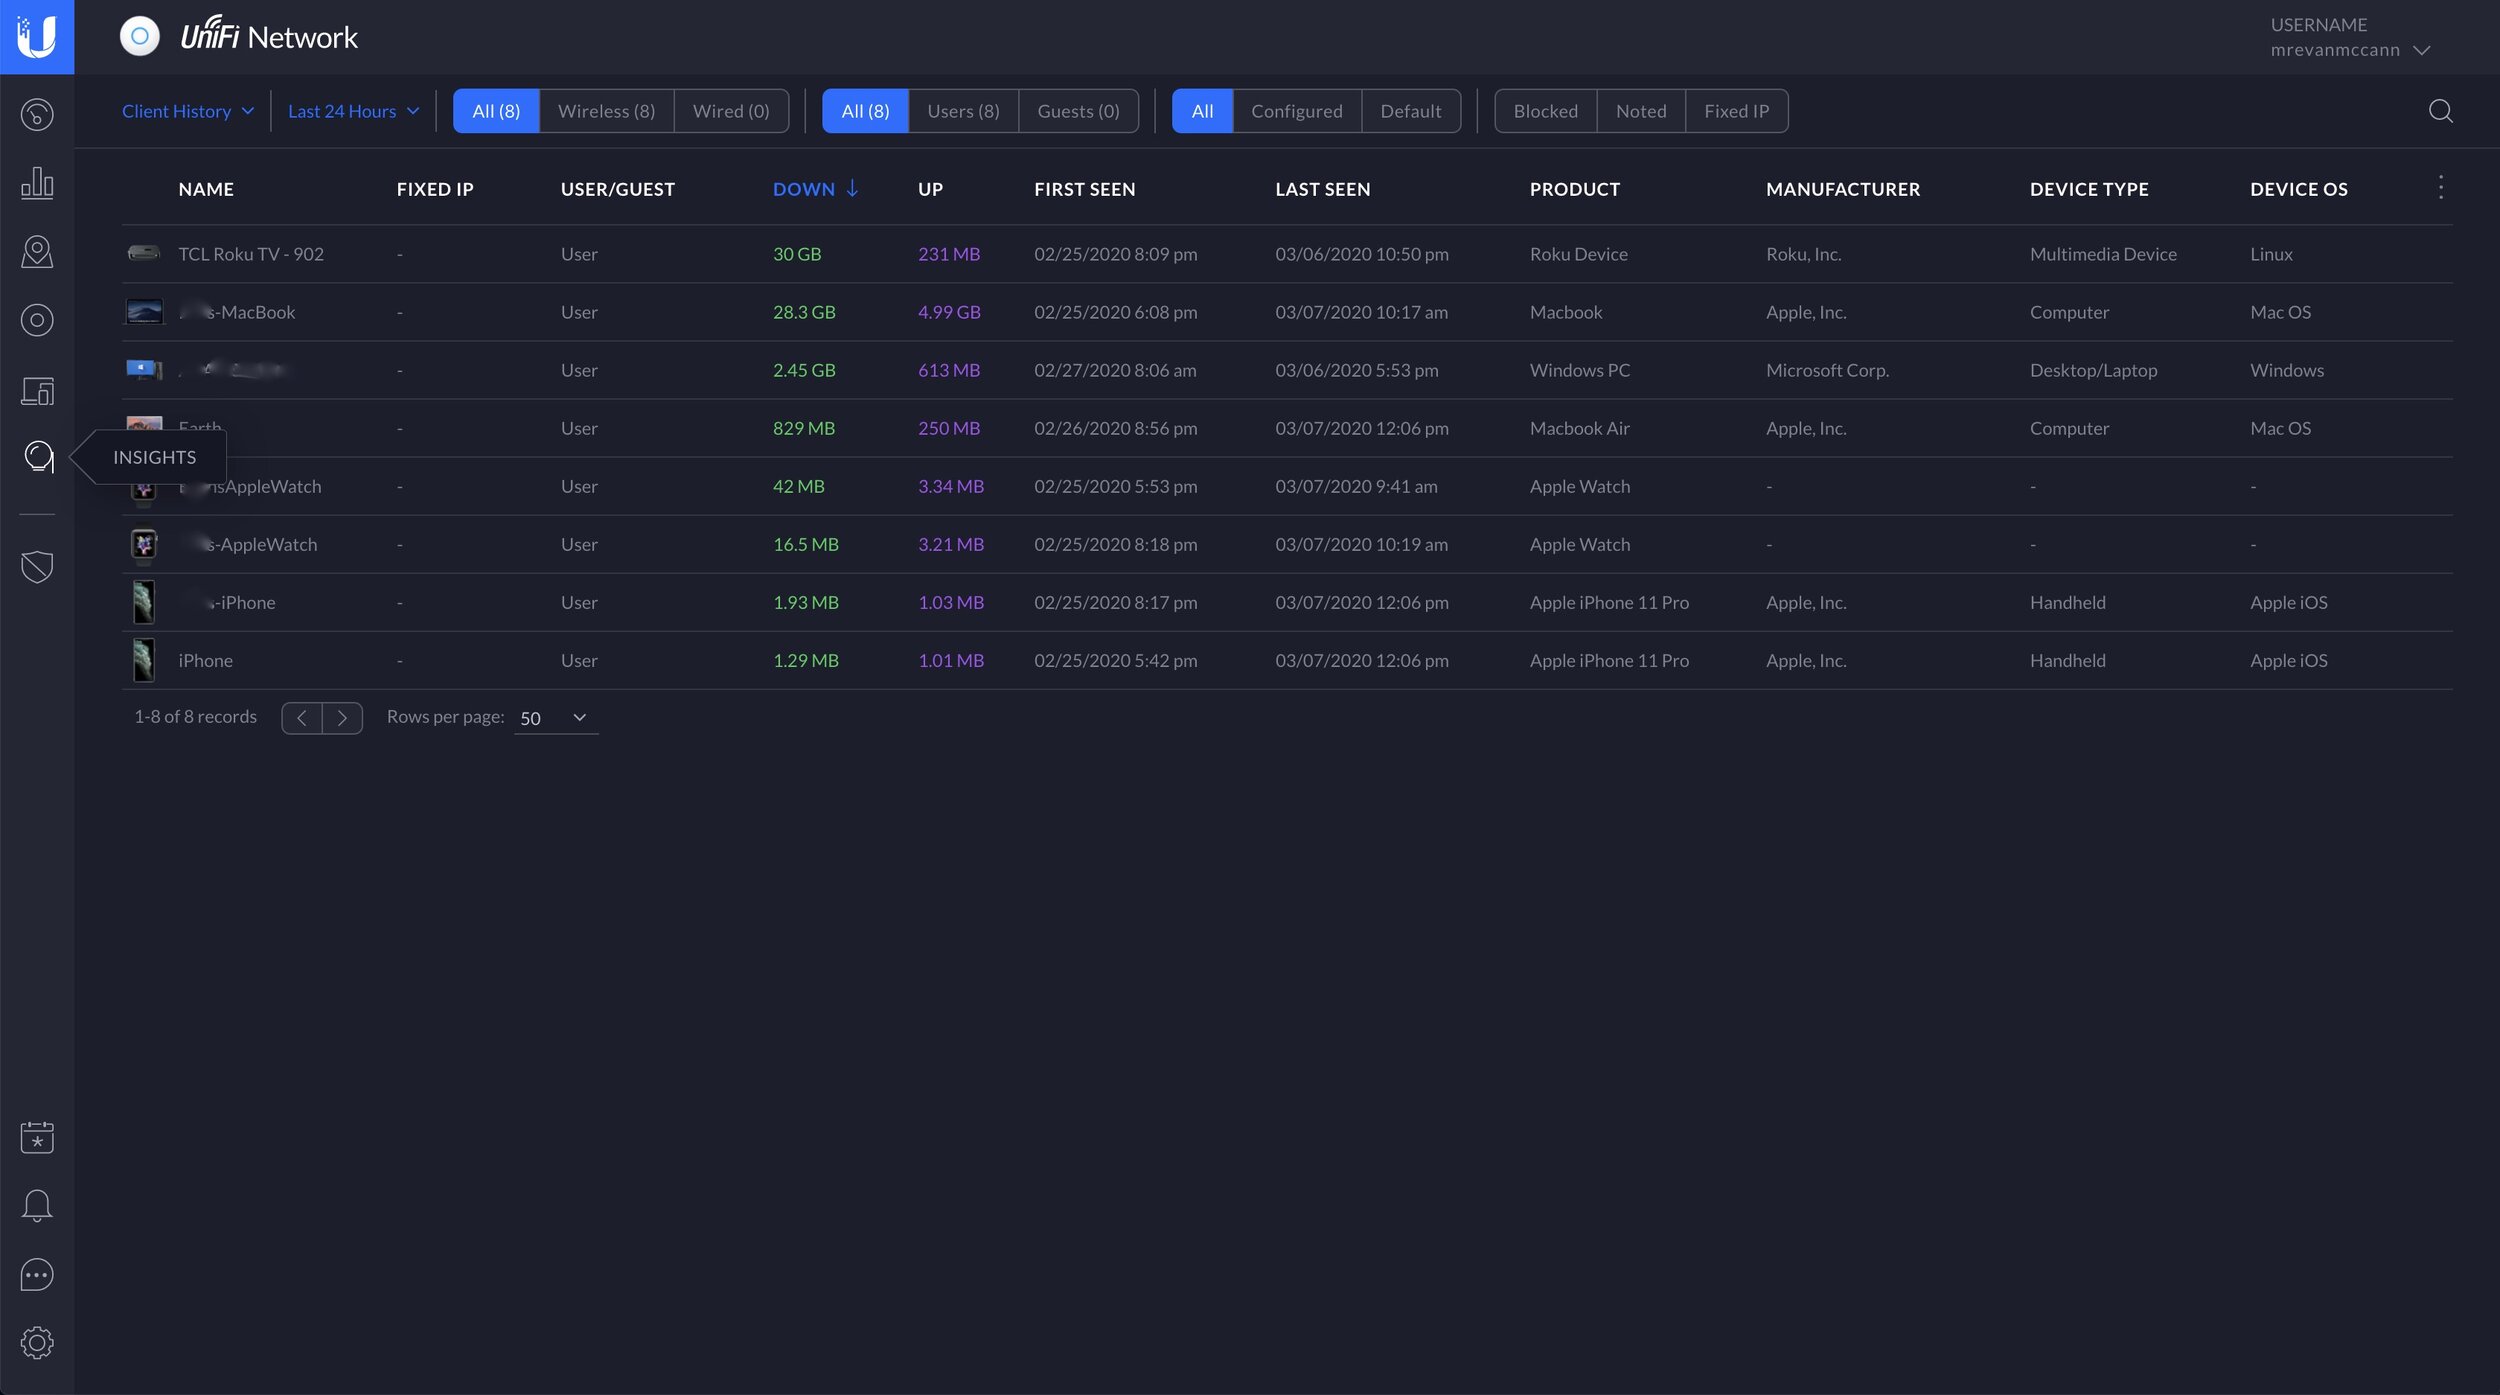
The biggest benefit of the UDM is the UniFi controller software, which you can demo here. UniFi lets you do things that most home networks either don’t do, or don’t do well. Most equivalent systems either have a dumbed-down interface, or don’t support easy expansion with additional managed switches or wireless access points. For all it’s faults, UniFi is still a locally-hosted consumer networking ecosytem, and there’s not much else like it.
The UDM supports common networking features like port forwarding, SIP, uPnP, mDNS, Dynamic DNS, and custom DNS filtering. It supports IGMP snooping, DHCP snooping, and some custom DHCP options. Adding networks, VLANs, static routes and firewall rules are all pretty simple. If you want to setup a separate network for IoT or untrusted devices, the UniFi software makes that easy, too. You can customize your DHCP scopes and the DNS servers on a network level. I have my own internal DNS server, a Raspberry Pi running as a Pi-Hole. This provides DNS for my main wireless network, and is set under the “DHCP Name Server” network setting.
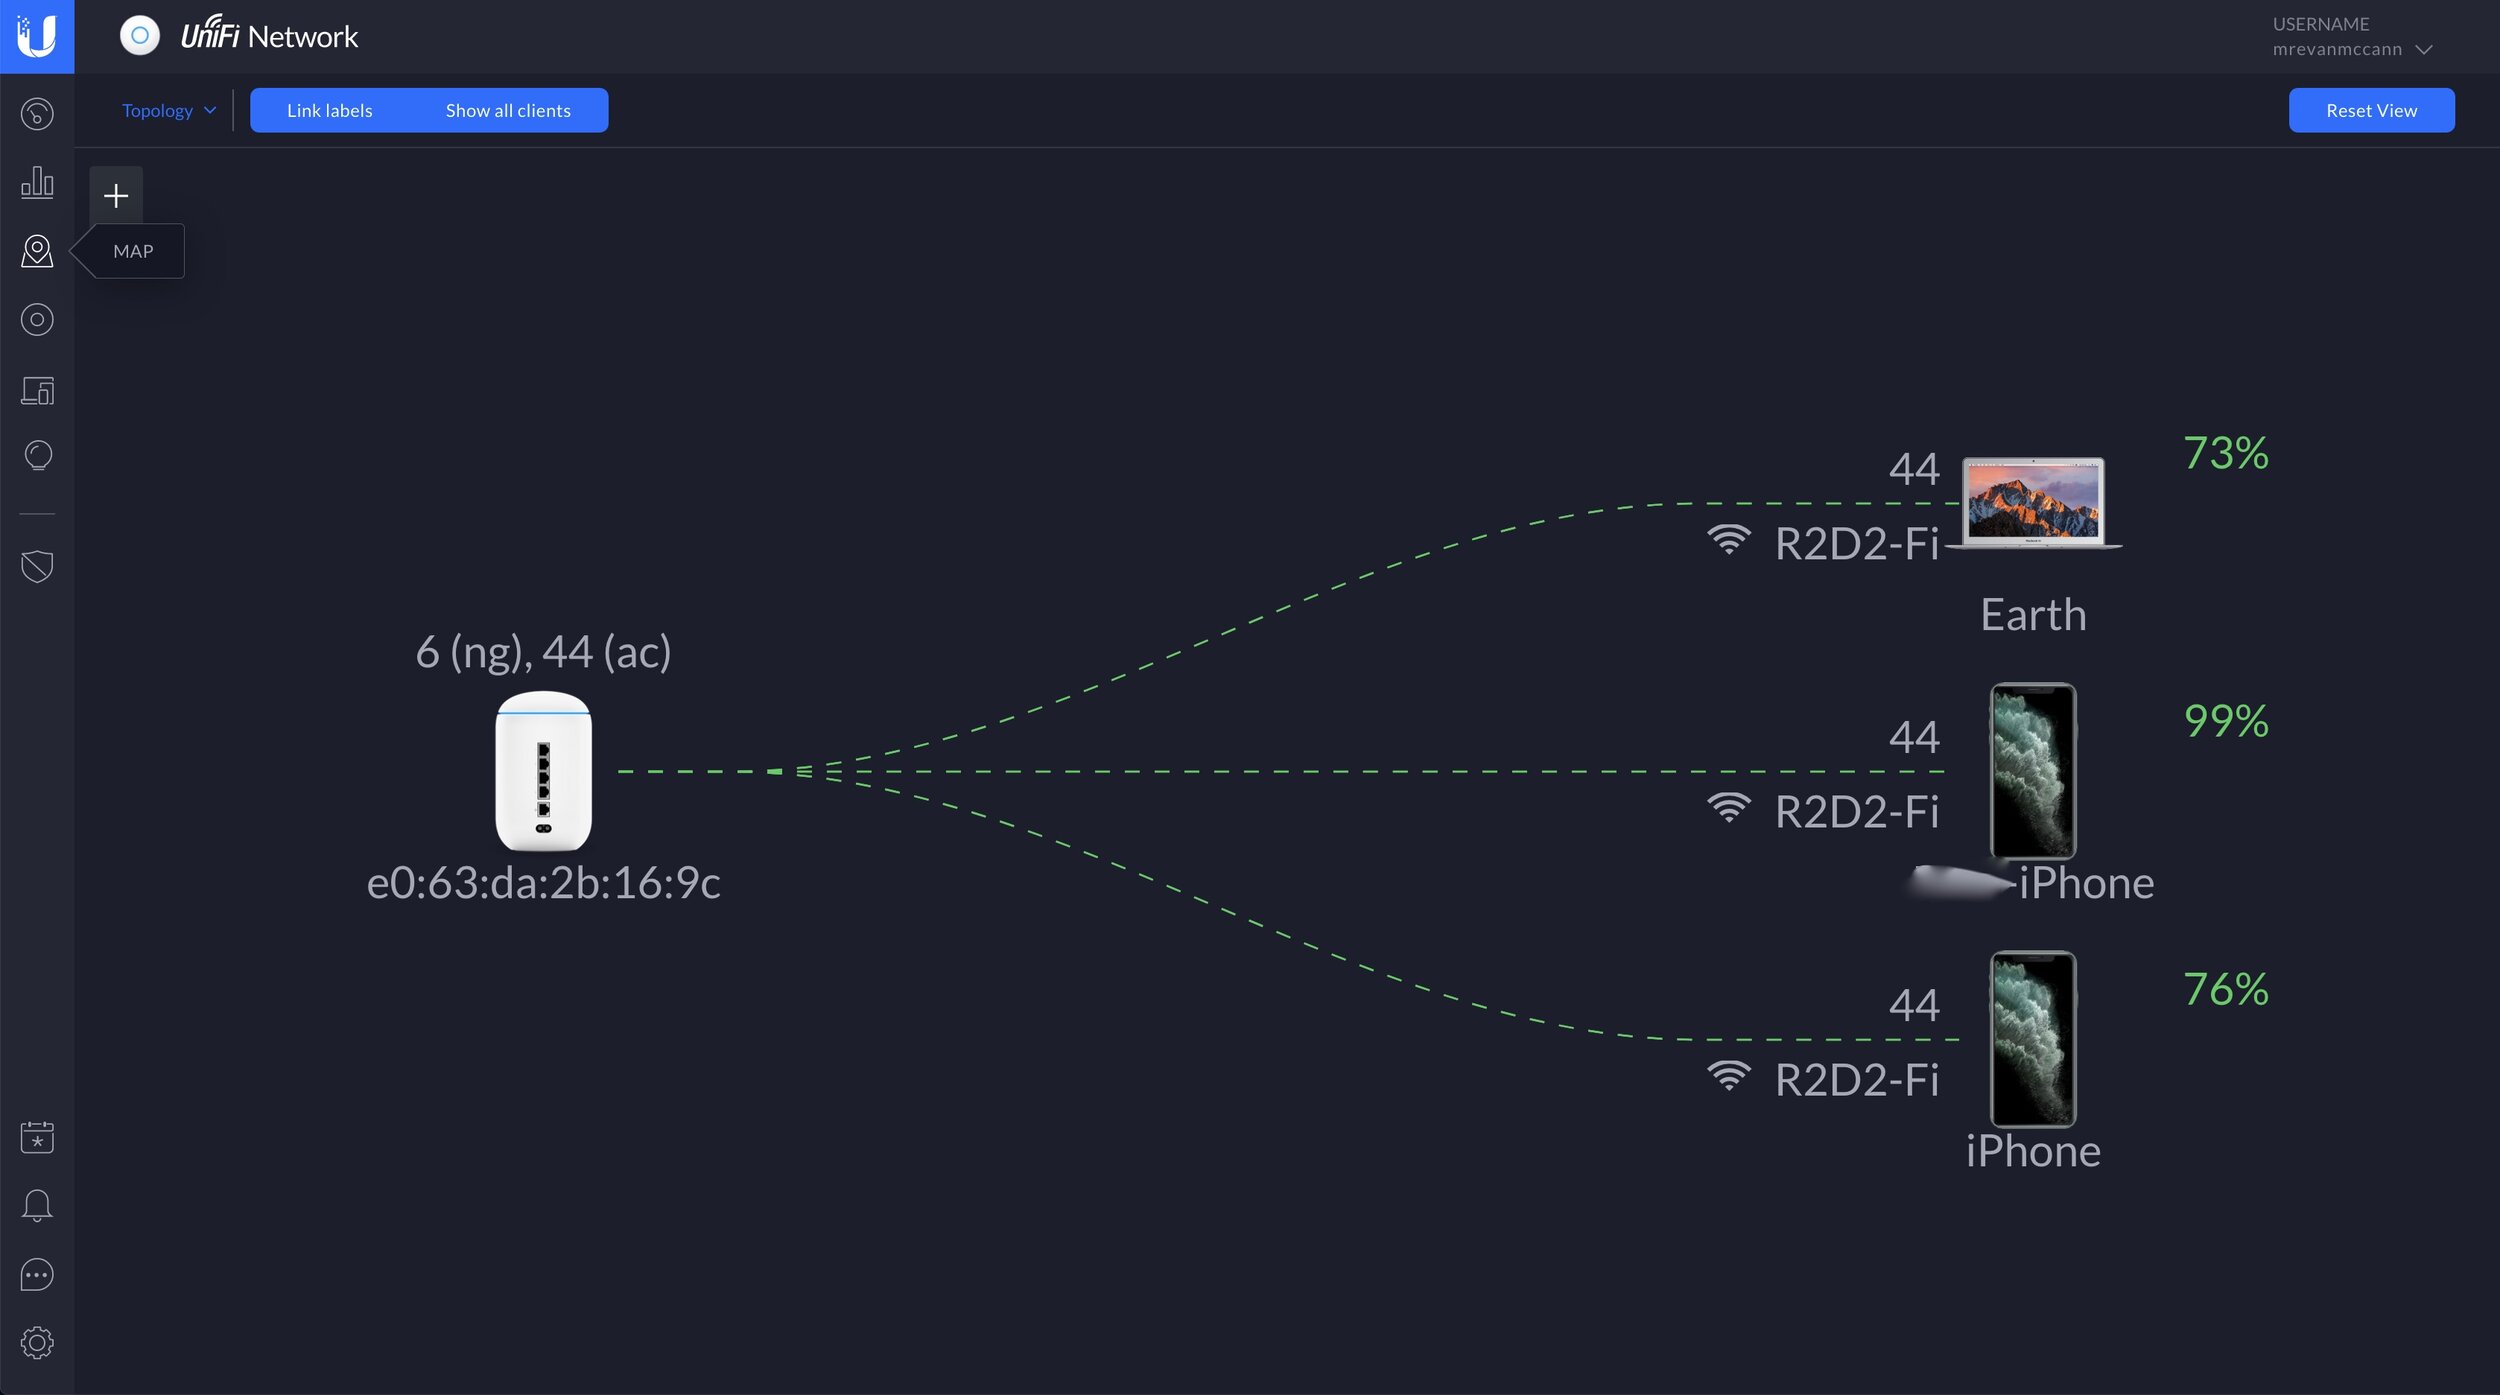
There are a lot of options and tools to help the performance of your wireless networks. You can manually set channels, channel width, and power levels. You can separate 2.4 GHz and 5 GHz networks, or keep them together. You can join other UniFi access points to your network via Ethernet or wireless backhaul. Band steering and minimum RSSI values can help keep clients from associating with the wrong access point. You can scan your RF environment and see which channels are heavily used in your area. You can view all these settings and the live performance of your network in the web interface or the app.
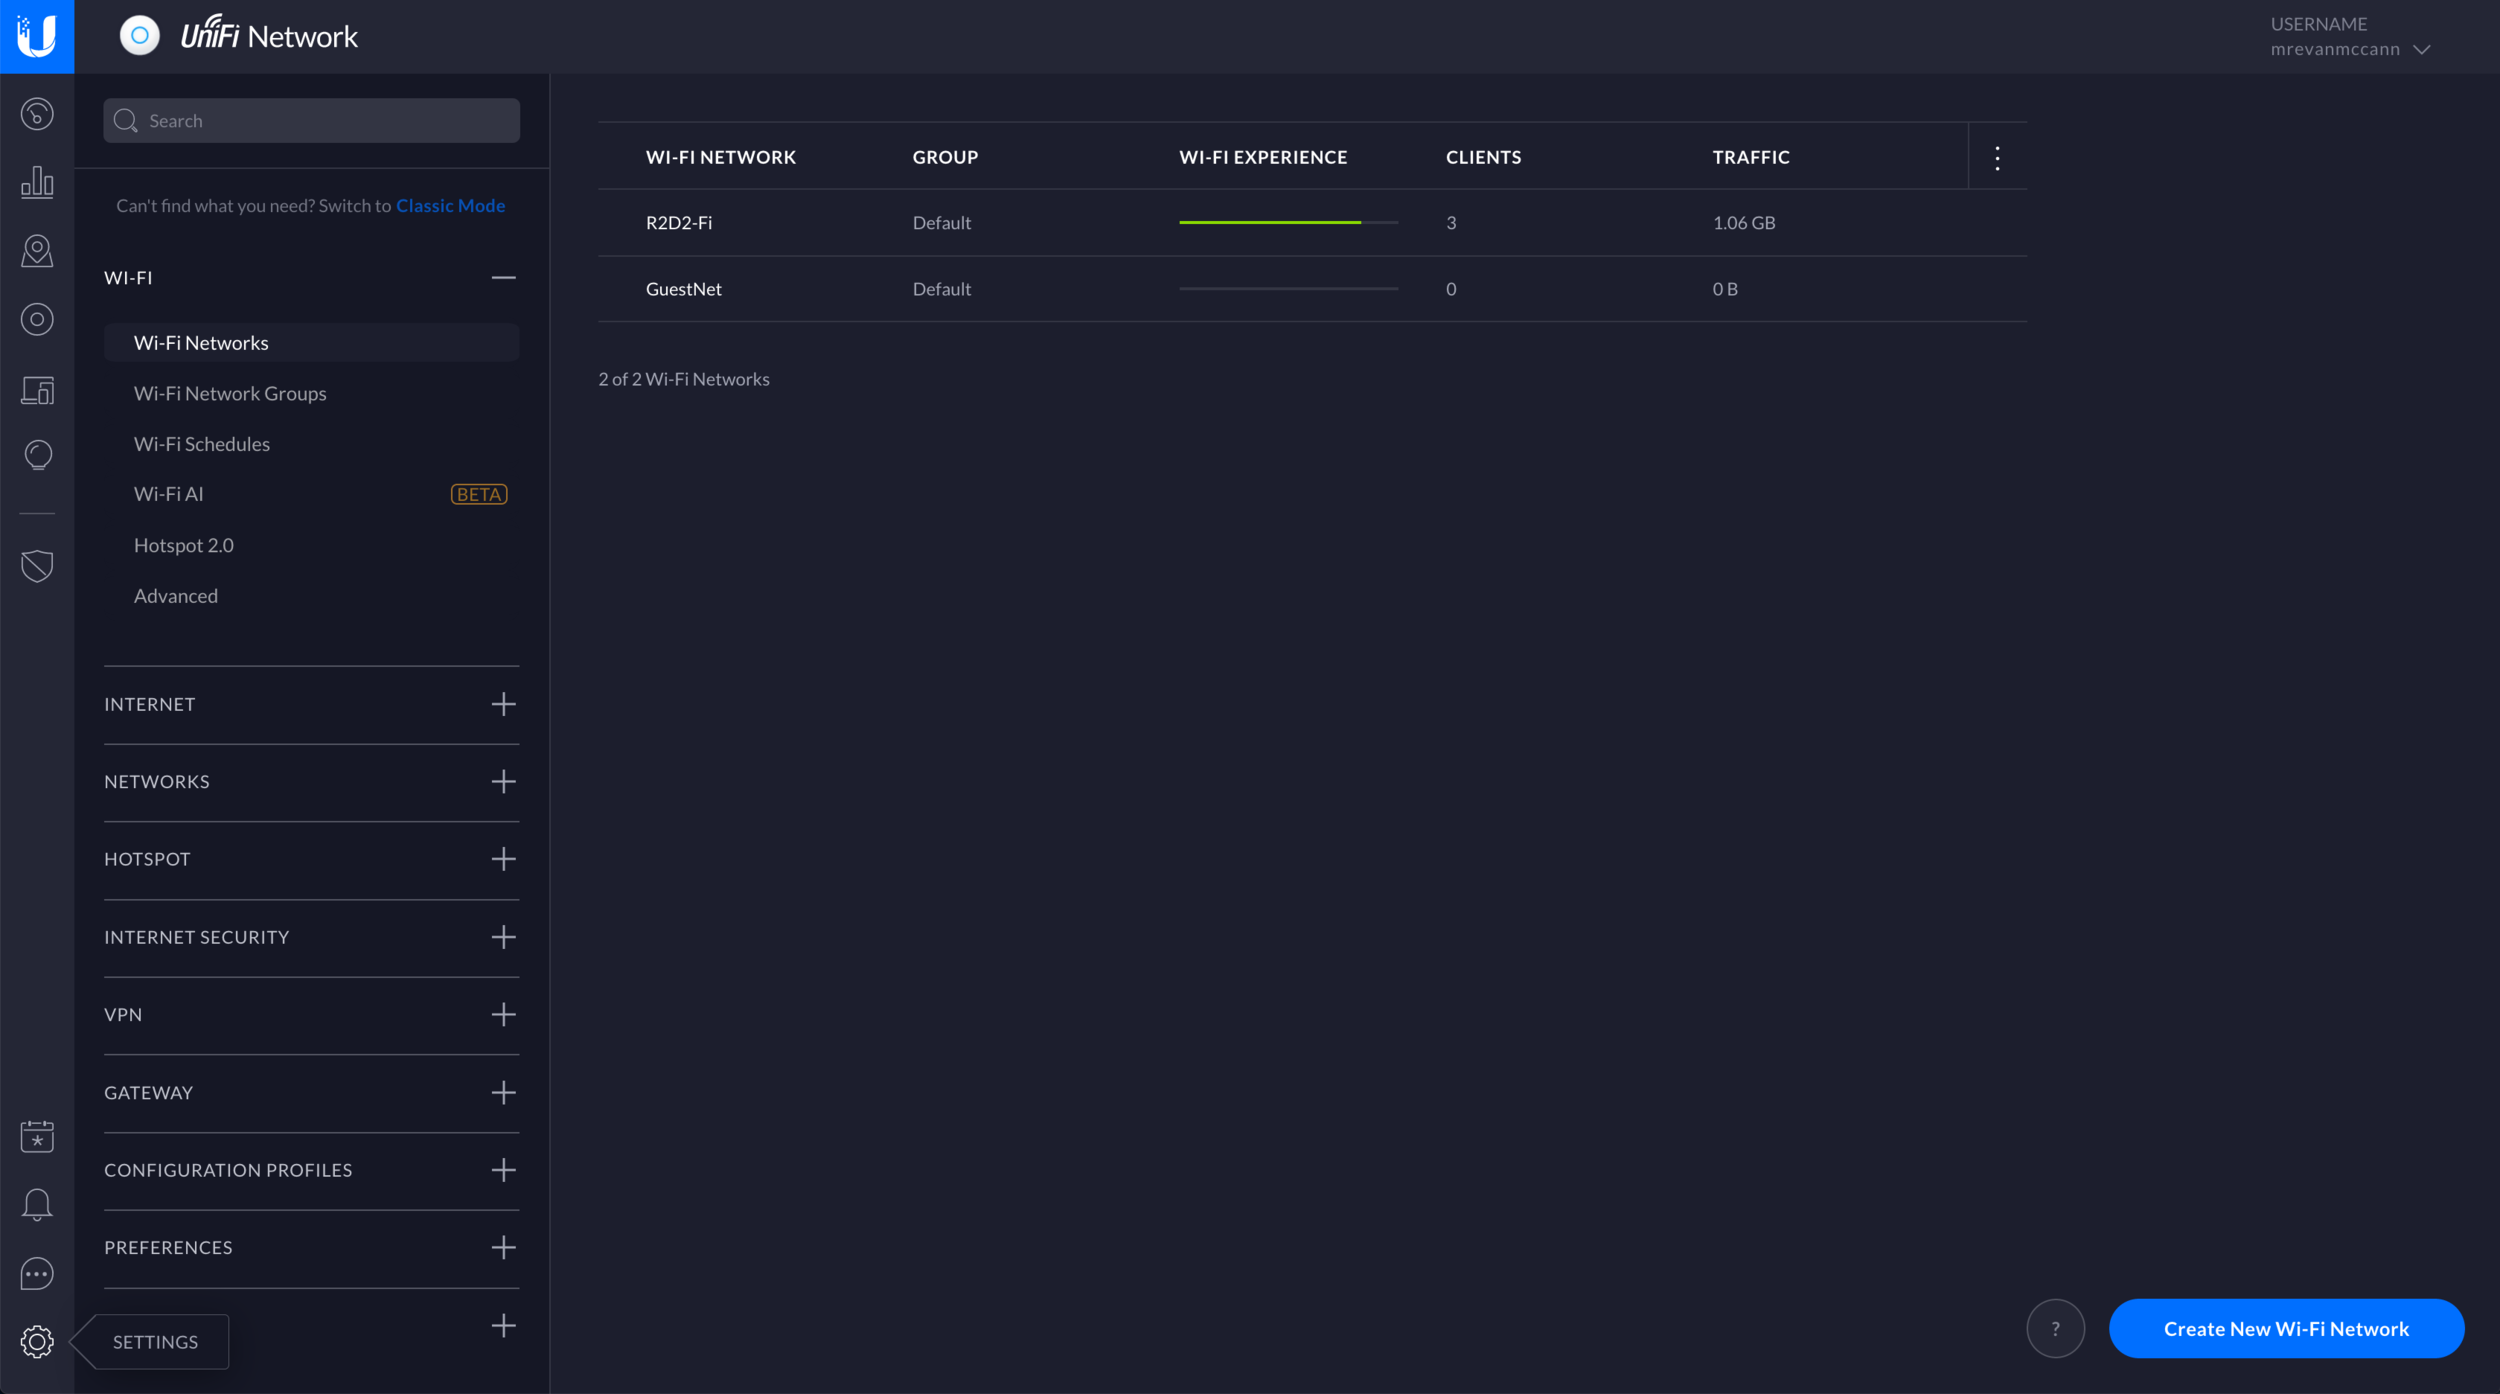
Adding a guest wireless network with a web portal is easy. It’s available under Guest Control in classic settings, or Hotspot in the new settings. You have the ability to make it an open network, secure it with a password, or use Facebook, Google, RADIUS, or vouchers to authenticate. You can have it lead to an external portal server, or set it up to require payment to access. It’s pretty full-featured, with one big exception. There is no way to load a custom SSL certificate in the GUI. You can do that through the CLI, but it will not persist after an firmware update right now. That means the built-in portal uses the UDM’s self-signed certificate, and guests will have to click through a certificate warning if you are using HTTPS. Add one more to the feature request pile.
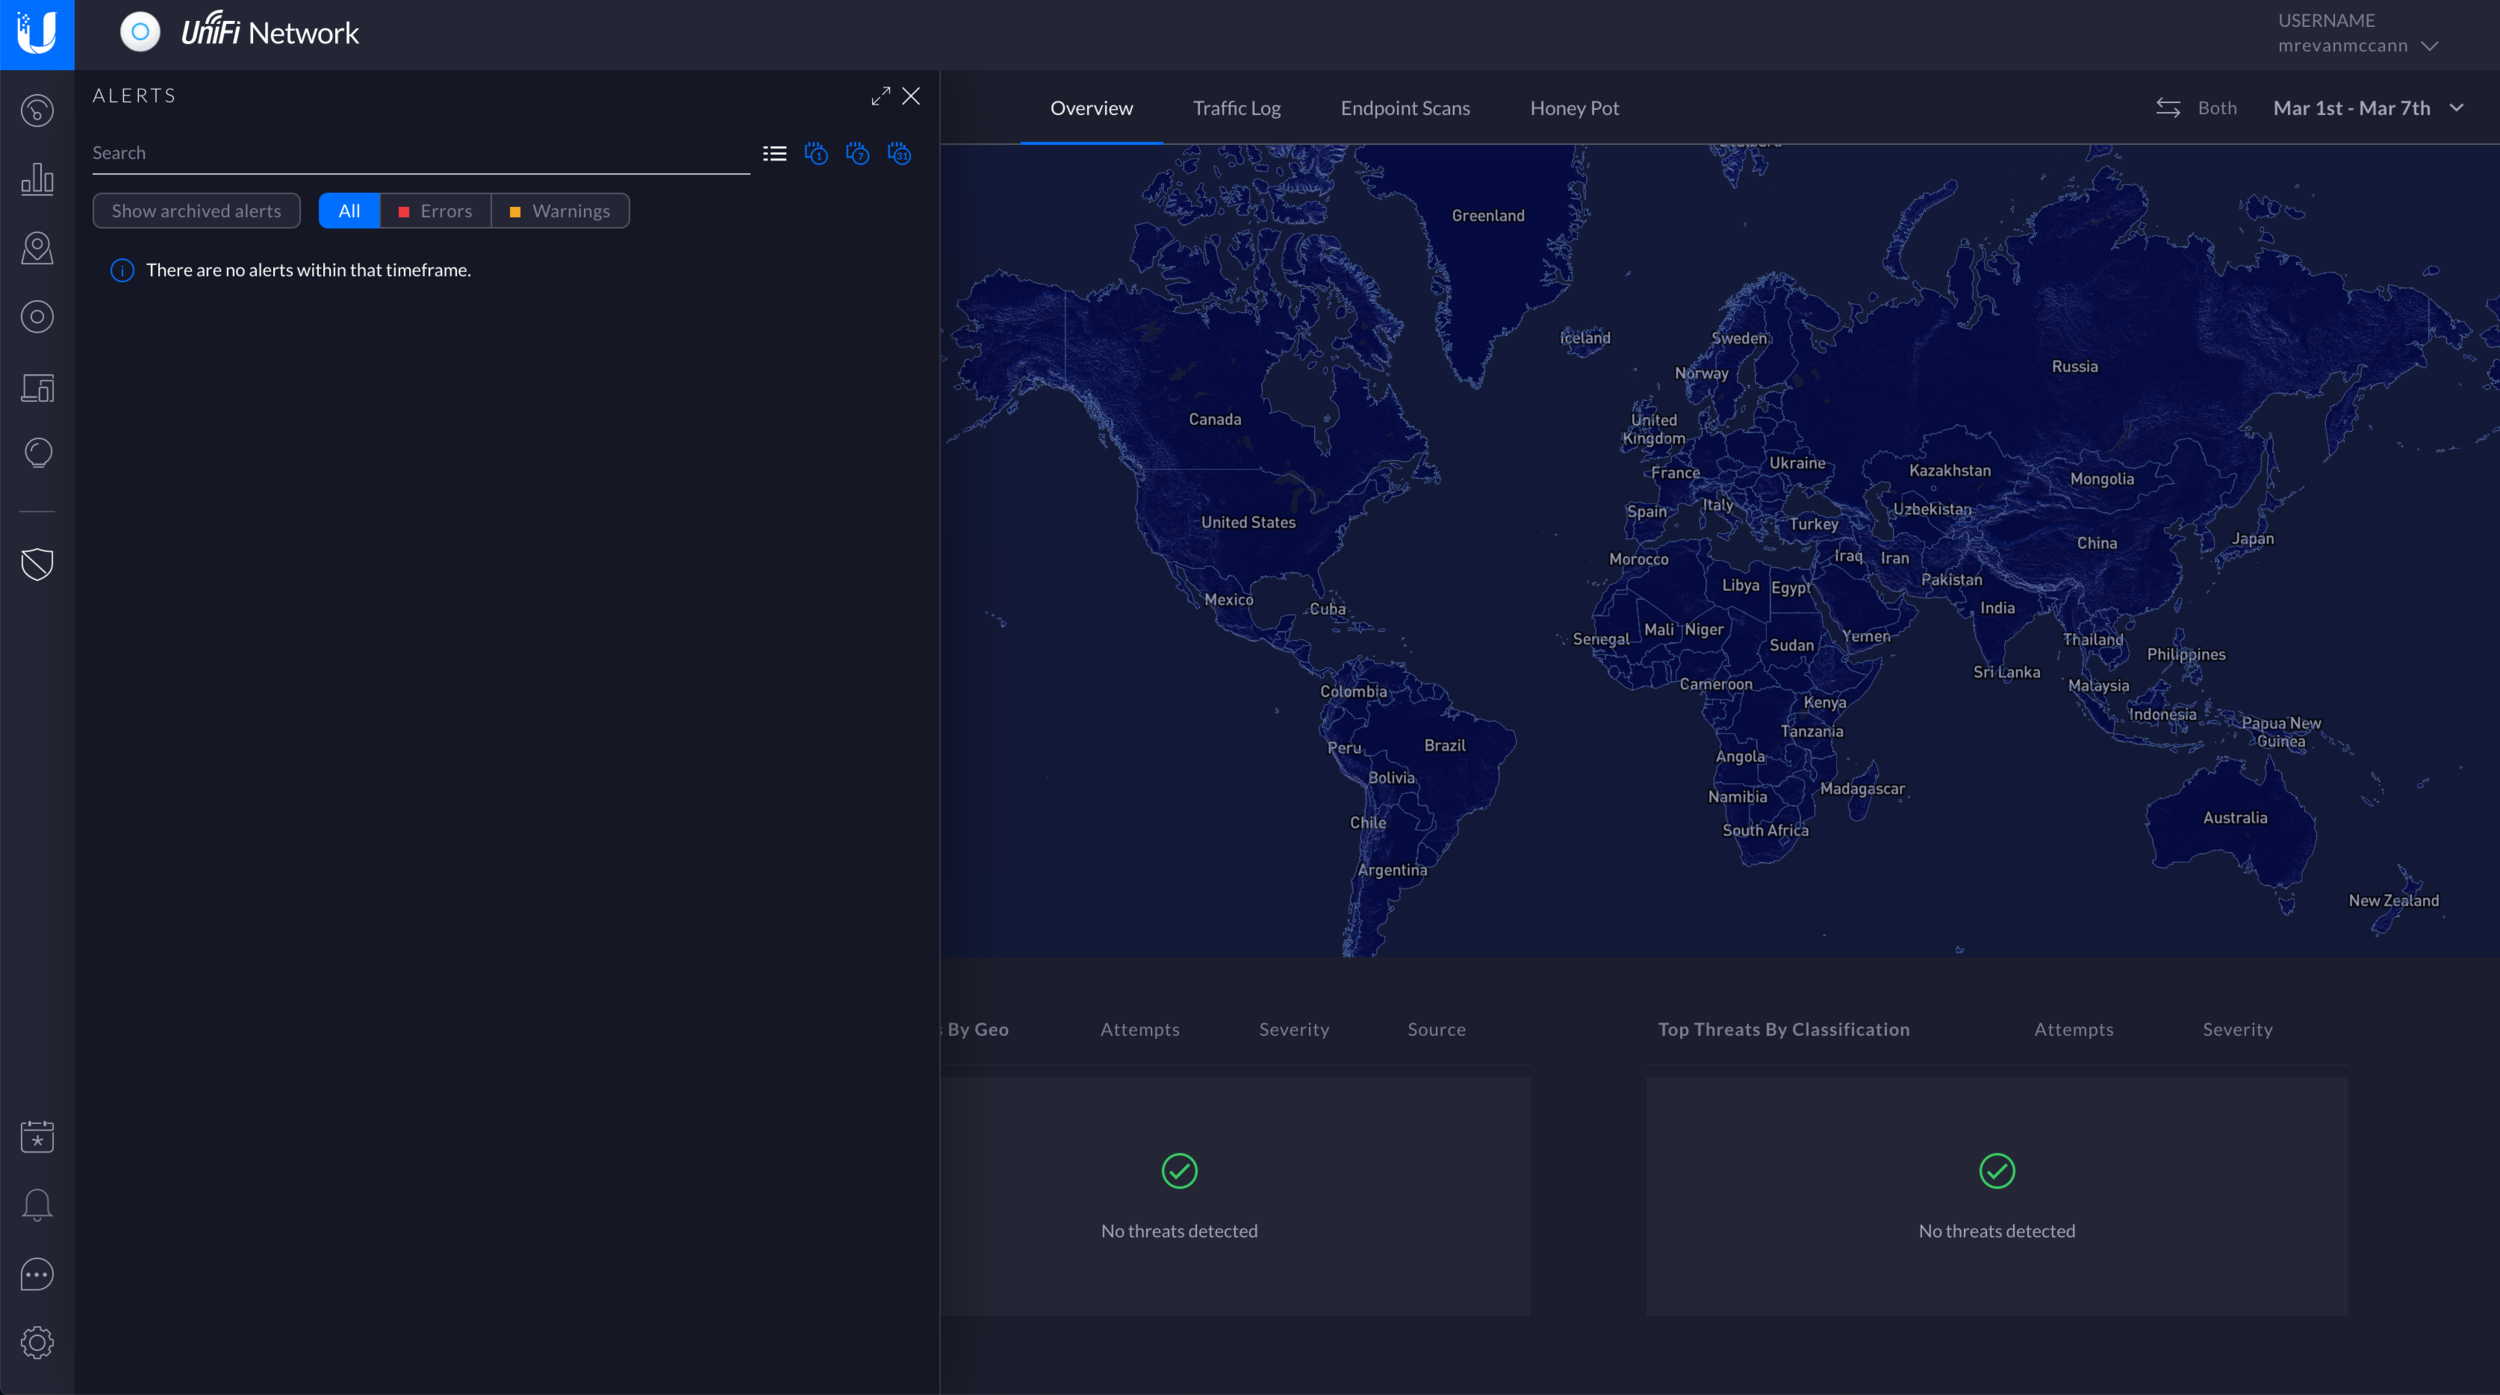
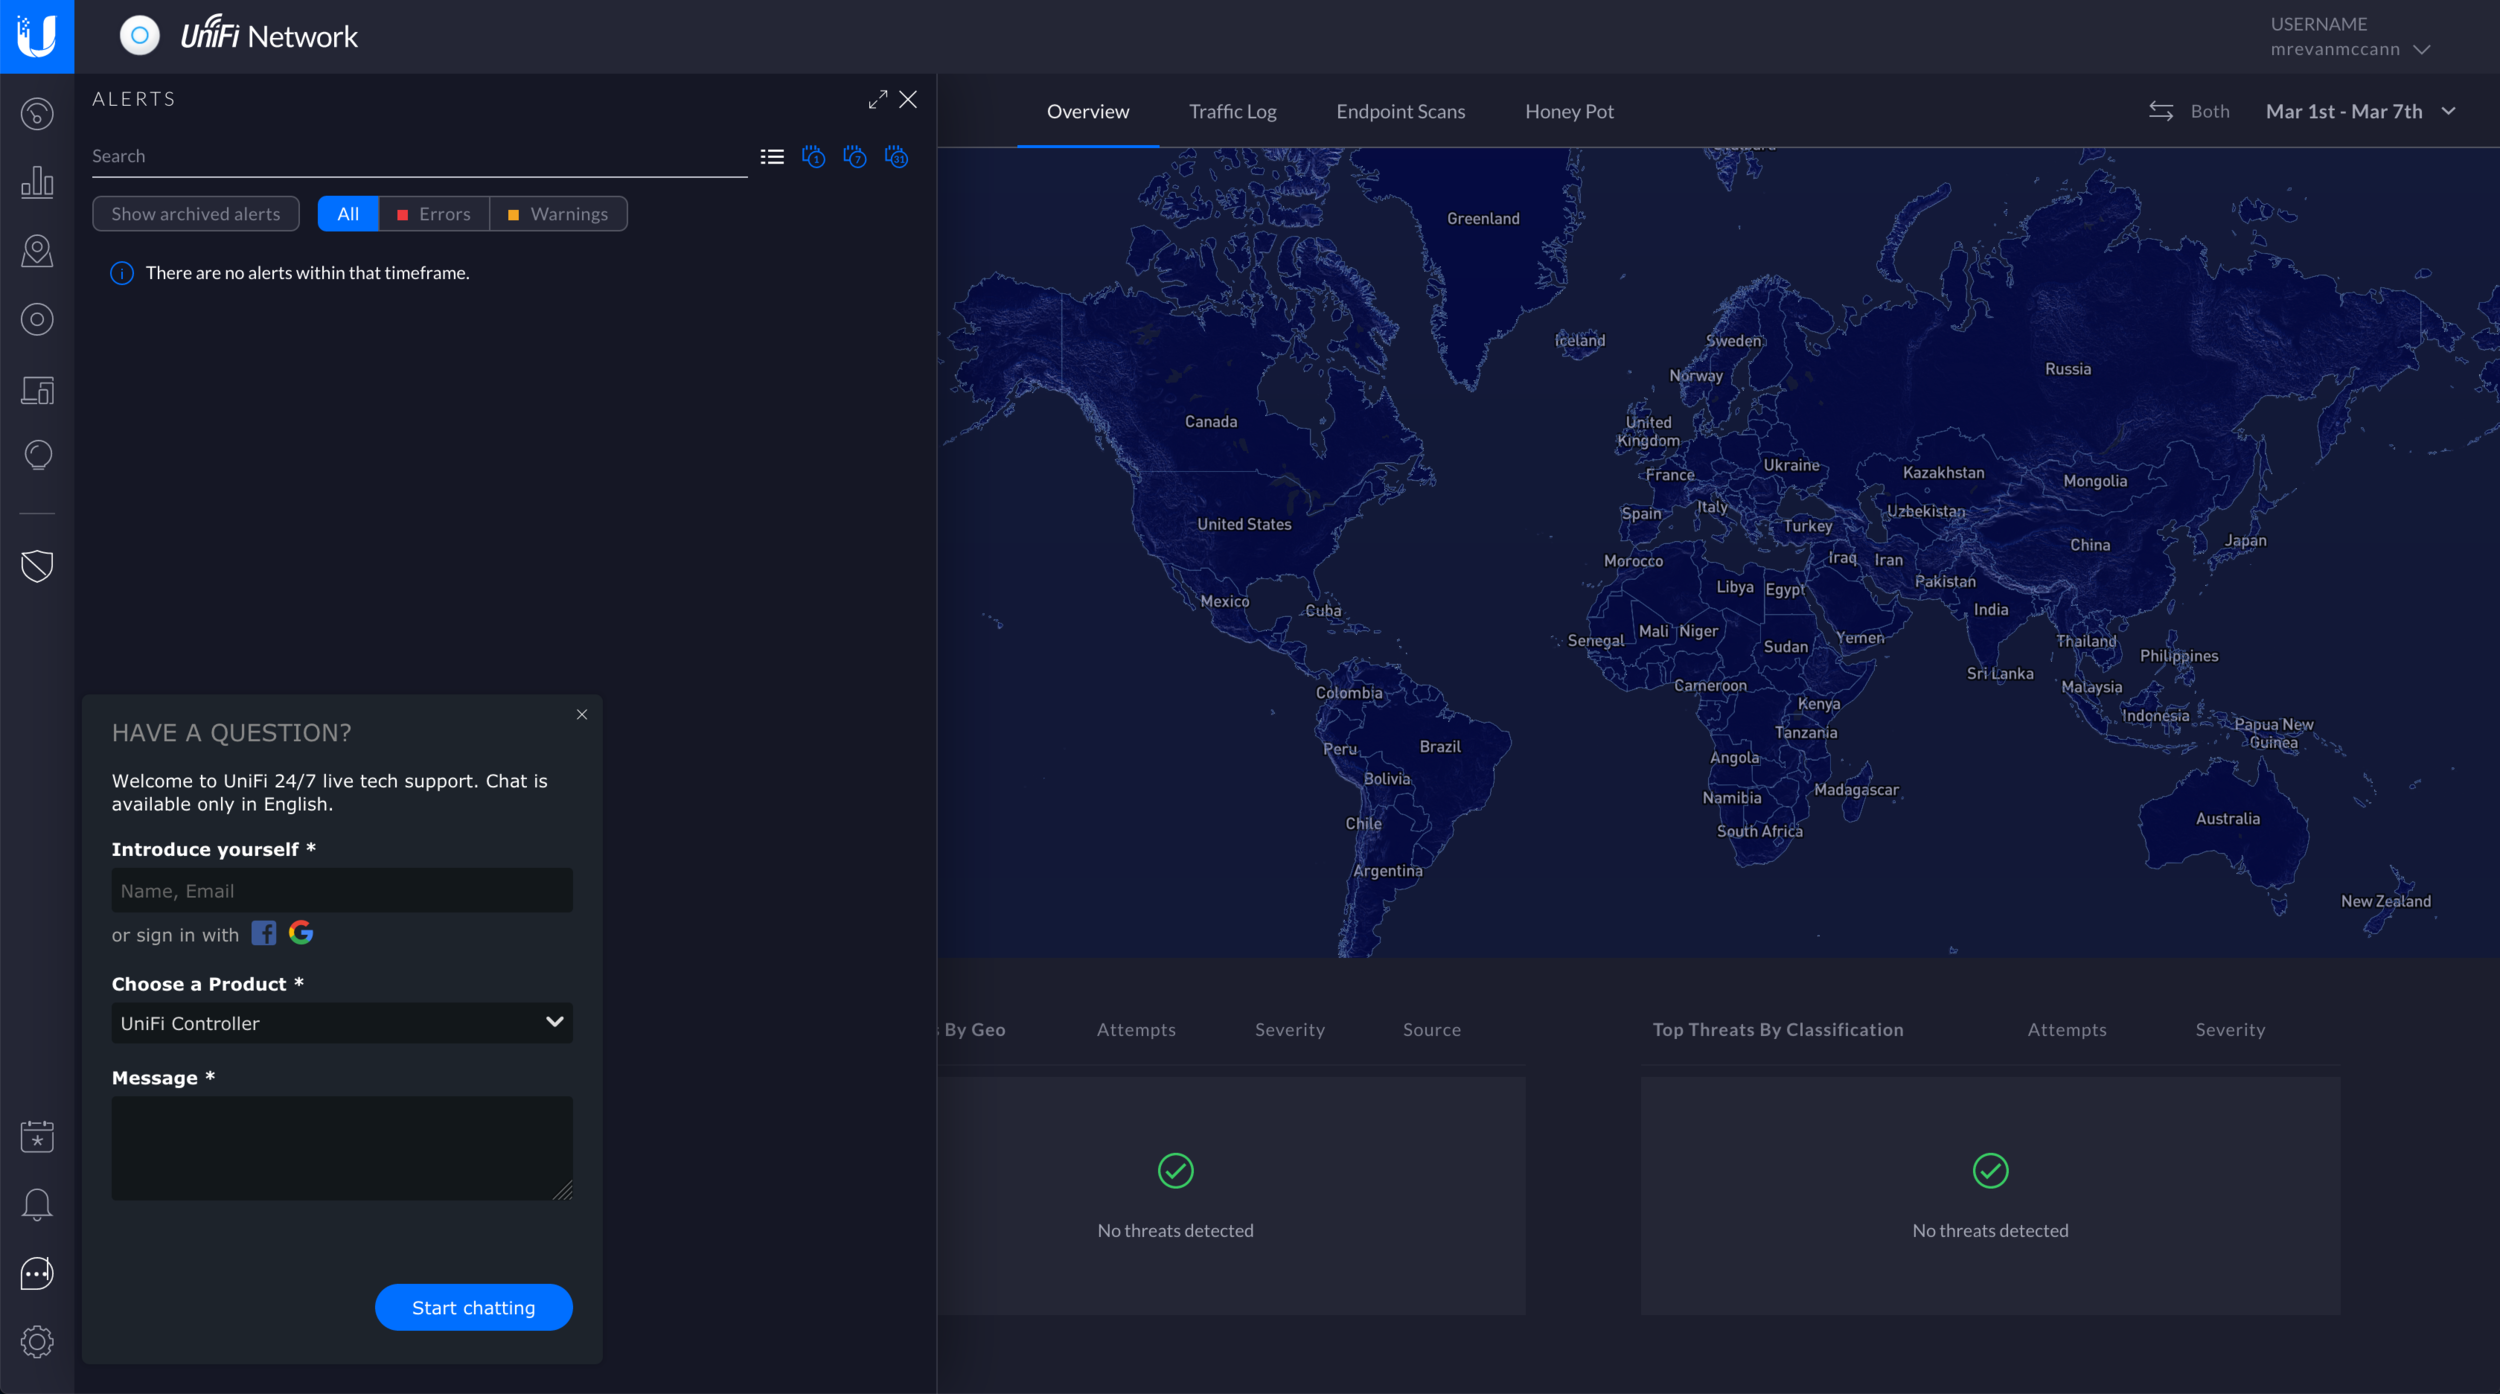
UniFi Threat Management
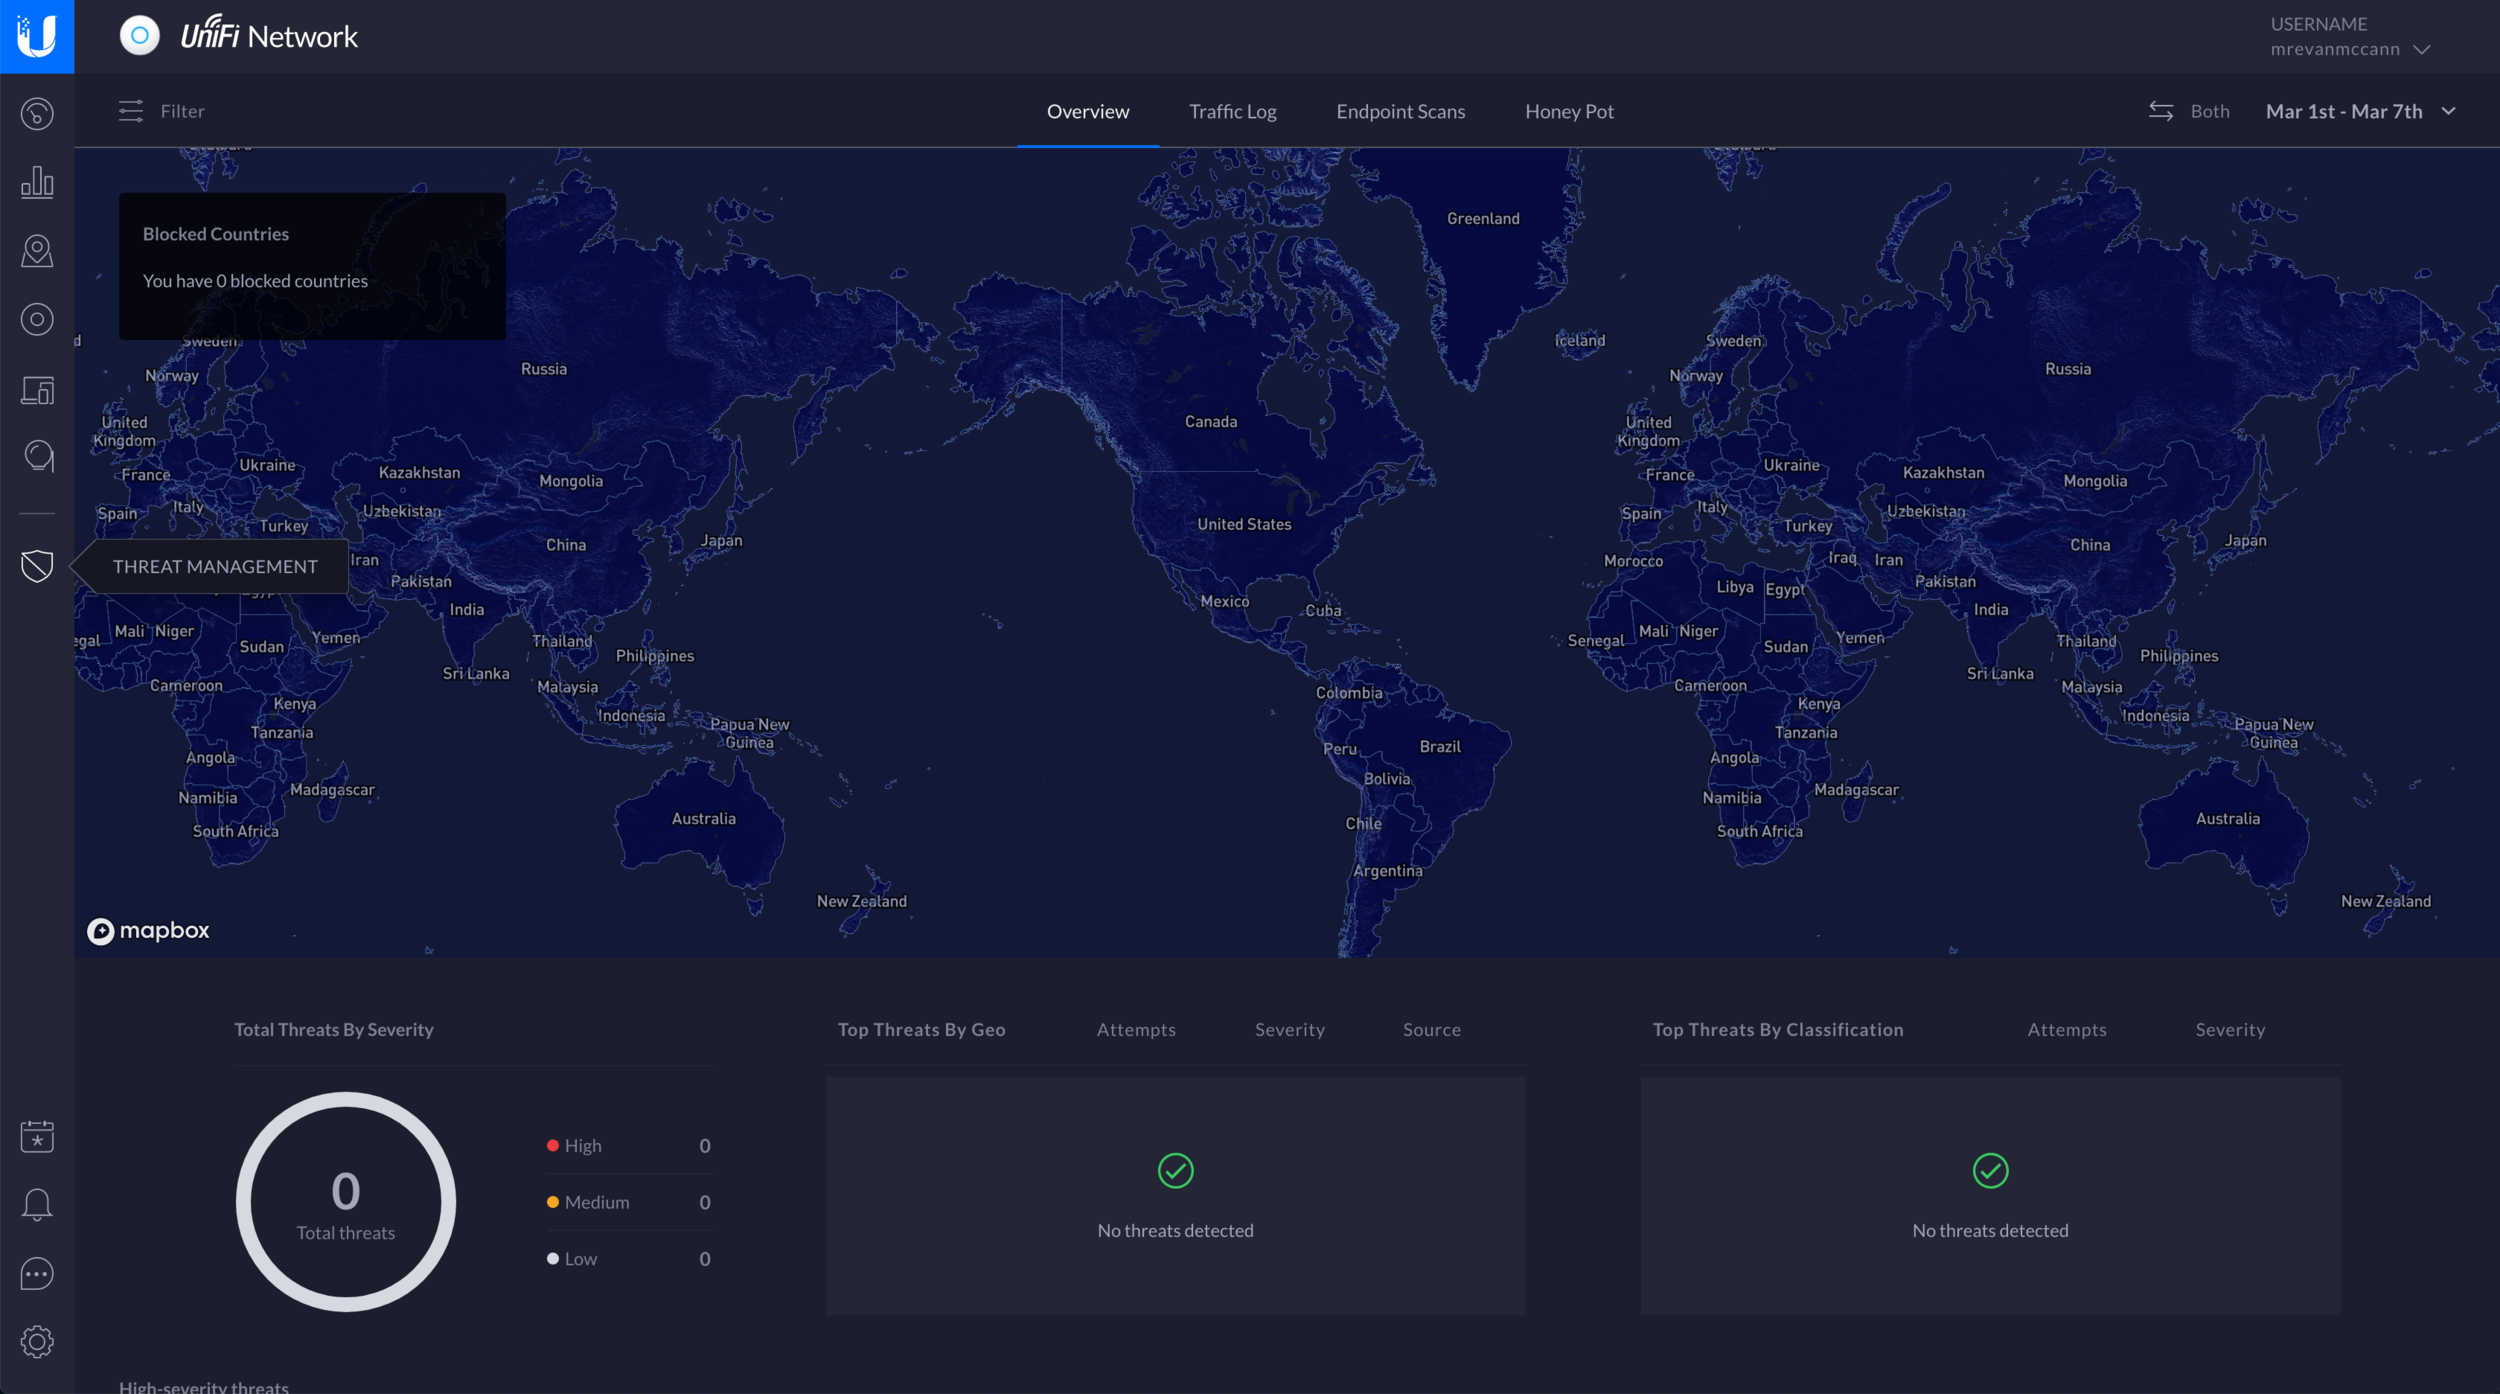
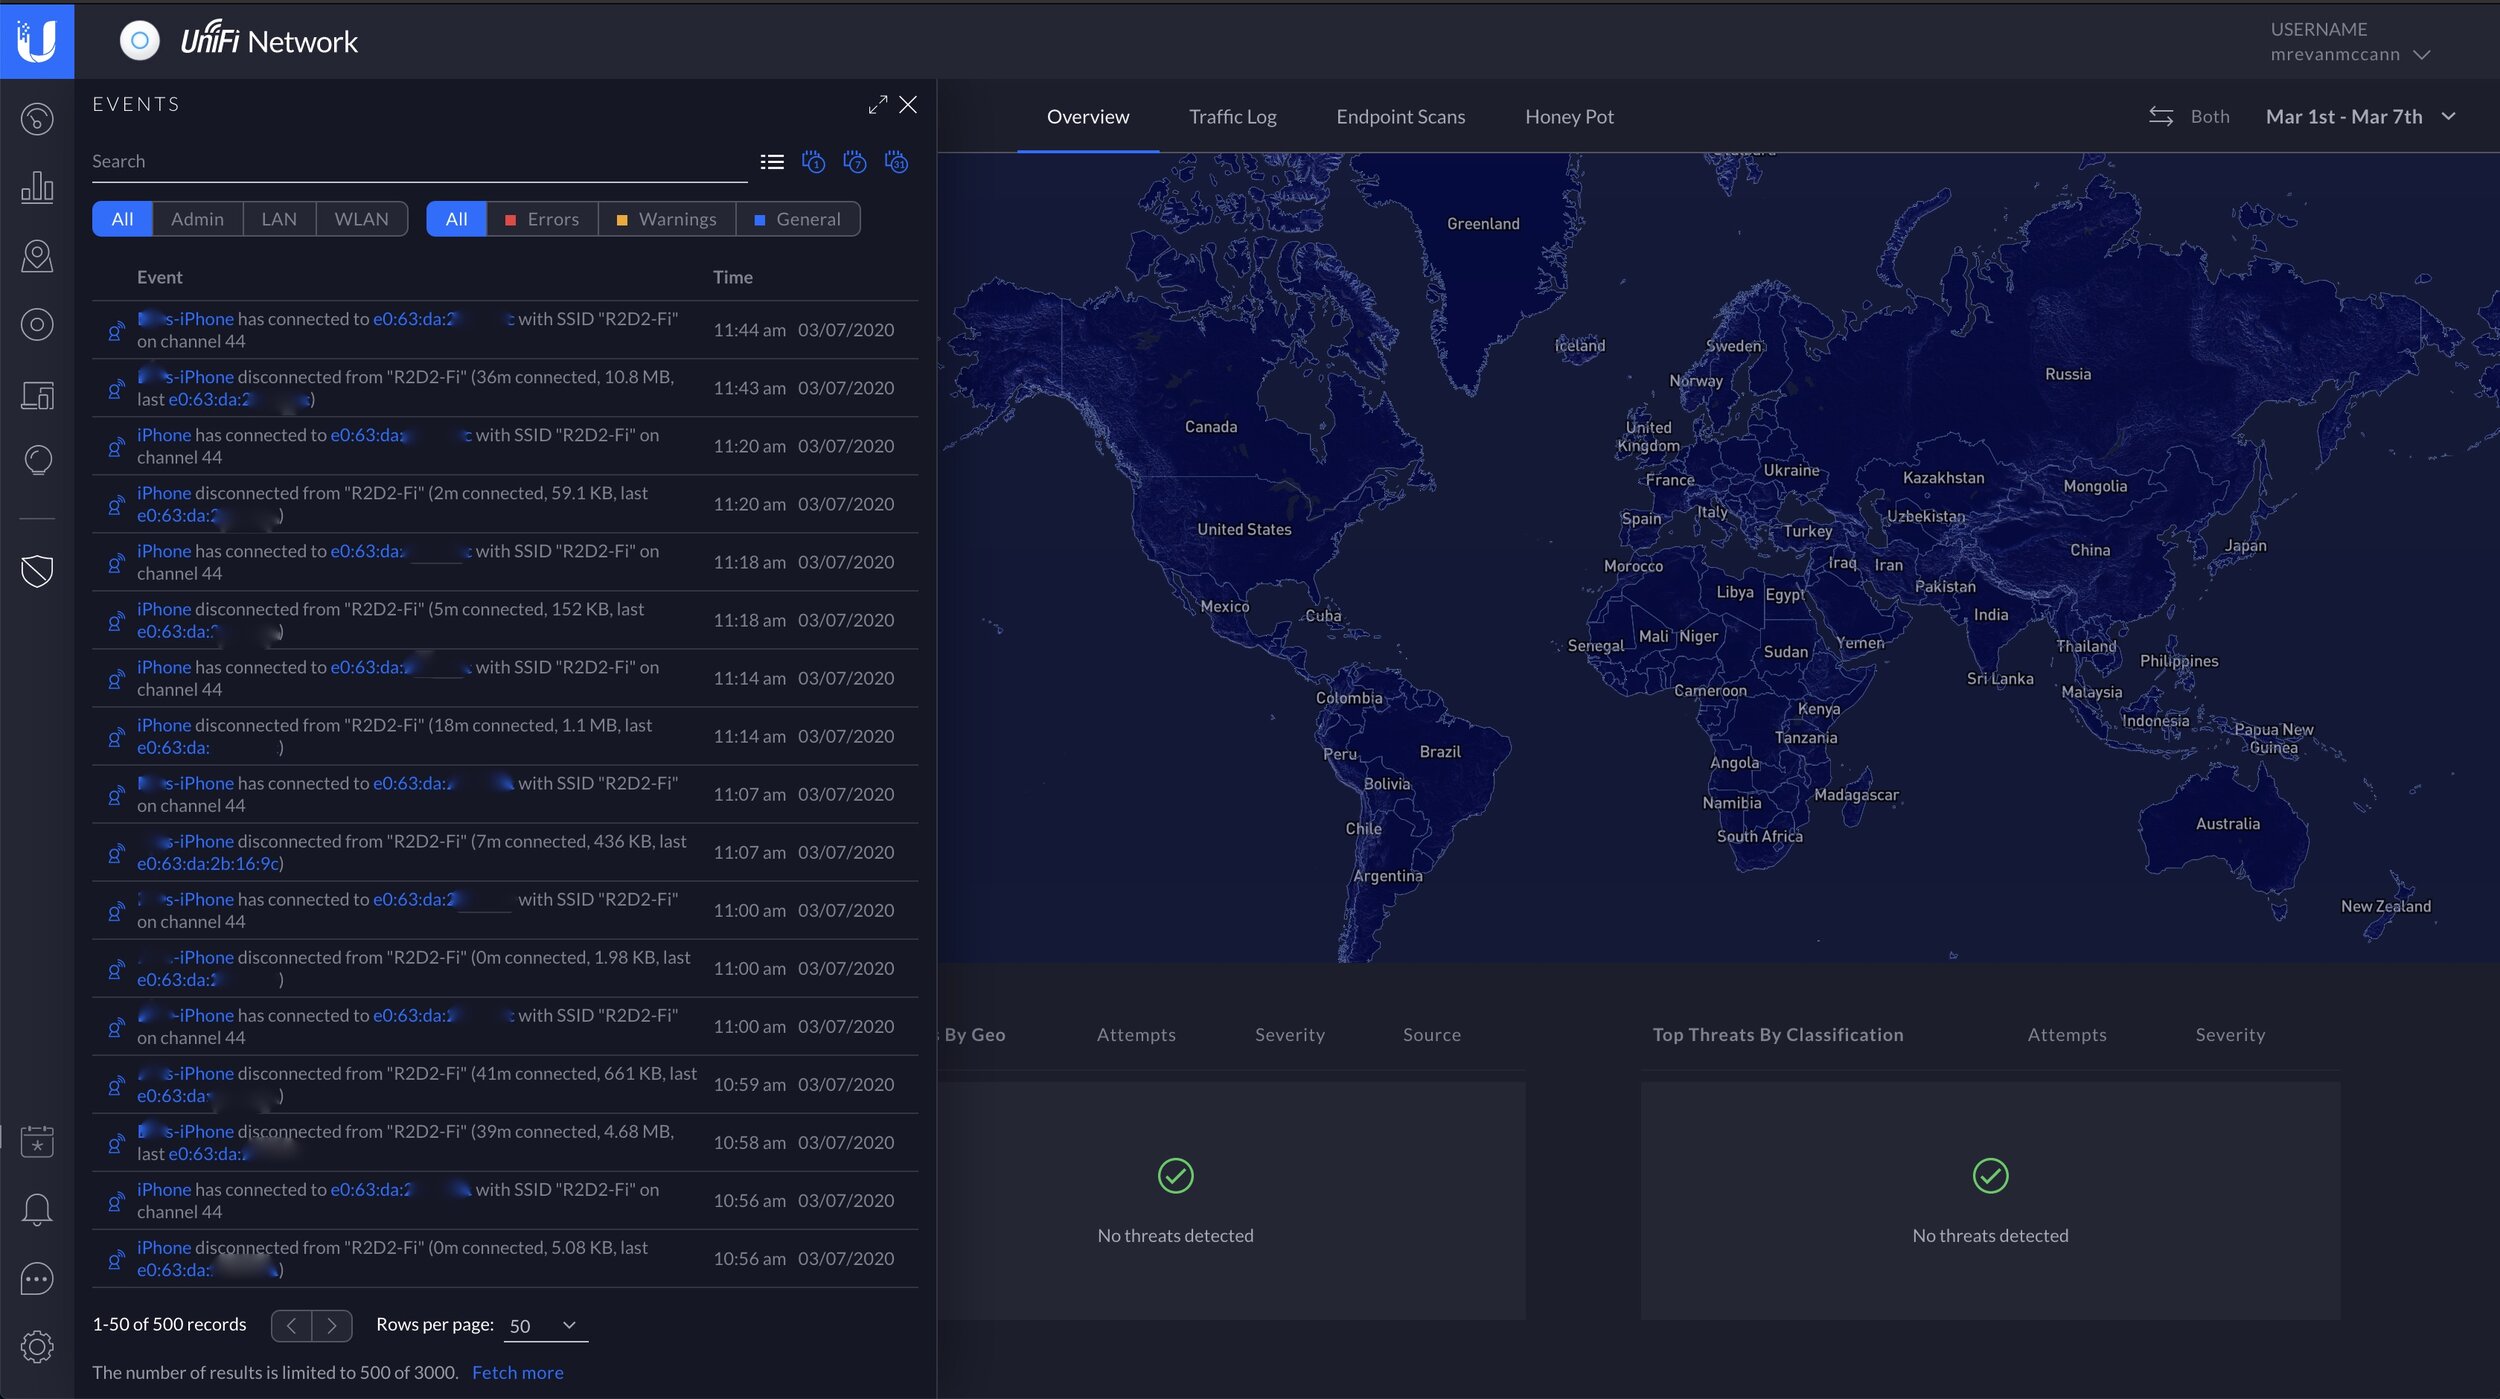
One of the more interesting parts of the UDM software is the Threat Management features, some of which are in beta. This is not an enterprise-grade firewall or security platform, and something like OPNsense blows it out of the water in terms of features and flexibility. The threat management built into the UniFi controller is much more limited, but it is simple to operate, and the UDM has performance advantages over older UniFi devices.
The UDM is capable of running the intrusion detection and intrusion prevention (IDS/IPS) at over 850 Mbps. The USG can only handle 85 Mbps and the USG-Pro 250 Mbps. IDS will alert you when it detects malicious traffic, and IPS will prevent that traffic from traversing your network. It also supports endpoint scanning, deep packet inspection, GeoIP filtering, and allows you to deploy a honeypot to monitor for attacks on your network. It has DNS filters which allow you to block adult or malicious content, VPNs, and will set search engines and YouTube to safe mode. You can also define whitelists, or specific firewall rules to further customize the security of your UDM.
UniFi Dream Machine Limitations
While it has a lot of the benefits of UniFi, it also has some downsides. UDMs are not able to be adopted by external controllers, making it difficult to deploy at an external site. A lot of managed service providers deploy UniFi systems for customers (or parents), and manage them all centrally from one instance of the controller software. That isn’t possible with the UDM right now. You are able to manage it remotely, but only through Ubiquiti’s cloud service, and only in separate controller instances for each site.
Another downside is common to every all-in-one device, and makes the UDM a weird fit in the UniFi line: it’s an all-in-one. Just like the UDM-Pro, that also means it’s a single point of failure. If you want to upgrade the UDM in a few years, you can’t just replace one part. In order to upgrade to WiFi 6, you can purchase an external AP, but there’s no way to change the AC Wave 2 unit within the UDM. The lack of POE also hurts. There’s no way to support POE devices without an external switch or power injector.

The UDM lets you create site-to-site VPNs to other UniFi networks, but the options are limited. More details on that here. There is no current way to tunnel all your traffic through a VPN service. There are a bunch of features like this which are not yet implemented on the UDM. It’s a new line of products with a new operating system, it will take some time before it is fully featured.
A few advanced features, including anything that required editing a JSON file with the USG, are not possible with the UDM right now. Some basic features are missing, like multiple IPs on a WAN port, or adding an SSL certificate to back the (otherwise excellent) guest portal support. Perhaps the biggest downside of all is that you are relying on Ubiquiti to fix these small issues, and their track record isn’t great in this area. Sometimes they get to it, sometimes they don’t. Sometimes the features they do build are incomplete or buggy.
Overall, if there’s something the UDM doesn’t do yet, do not count it getting added in the future.
UniFi Dream Machine Competitors
Since the UDM is an all-in-one, it’s natural to compare it to a lot of the normal consumer routers you find in a big box retailer. If you are only interested in the speeds and feeds, you will find higher numbers elsewhere. A lot of the value of the UDM is tied up in the software and the UniFi ecosystem. The best thing about the UDM is the controller software. It’s better than what most other consumer-grade routers give you.
That said, if you’re interested in upgrading your home network and don’t care about what UniFi gives you, a better option may be a Wi-Fi 6 mesh kit. I recently review the Eero and Eero Pro 6, Dexo X60, and Velop AX5300. I also compared them all and did in-depth speed testing. The UDM won’t be able to match the speed and ease of use of those devices, but the UDM offers more customization and expandability.
Wi-Fi 6 UniFi Dream Machine?
There has been no new about a Wi-Fi 6 or Wi-Fi 6E version of the UniFi Dream Machine. Ubiquiti has only started their Wi-Fi 6 access point rollout, and more models should be announced soon. I could see them possibly releasing an updated version of the UDM sometime in 2021, and I’ll updated this review if that happens.
Other Ubiquiti Guides and Reviews
- UniFi Router Comparison: USG vs UDM vs UXG
- UniFi Dream Machine Pro (UDM-Pro) Review
- UniFi Dream Machine vs. AmpliFi Alien
- How To SSH Into Your UniFi Dream Machine
- UDM Setup Guide: Discovery and Basic Settings
- UniFi Next-Gen Gateway (UXG-Pro) Preview
- Unofficial Ubiquiti Guide
- Ubiquiti FAQ
- Ubiquiti's UniFi Ecosystem Explained
- Ubiquiti: UISP Is The New UNMS
- How Wi-Fi Works, From Electricity to Information
- UniFi Wireless Access Point Buyer's Guide: 2021 Edition
- UniFi BeaconHD and Smart Power Plug Review
- Upcoming UniFi Switches Preview
- UniFi Switches Explained
- UniFi Switches Buyer's Guide
If you have more questions about Ubiquiti or anything in this post, leave a comment or contact me. I will do my best to point you in the right direction, or help in any way I can.